
Simple DIY mudroom lockers that are easy to build and add much needed storage and organization.
Mudrooms are the catch-all area of a home. As the first space you enter when coming in from the garage or back door, this area can often be messy and cluttered. Creating a mudroom design with detailed organizing is an easy way to provide you with more space. Learn how you can easily achieve extra storage as well as style by building your own DIY mudroom lockers with this step-by-step tutorial.

I decided to build my own mudroom lockers along the back wall. Building something like this can be overwhelming if you haven't tackled building projects like this before. I took it in stages to simplify all the steps. This makes the process much easier and gave me good stopping spots.
How to Build DIY Mudroom Lockers
First thing, gather all your needed supplies and tools.
Supplies for DIY Lockers
- 4 sheets of 4'x8' ¾" thick baltic birch plywood - Home Depot
- Poplar - for the bench or whatever wood you prefer
- Shiplap
- Miter saw/circular saw
- Skill saw
- Kreg pocket hole jig
- Kreg hinge jig
- Pocket hole screws
- Wood screws
- Nail gun
- Brad nails
- Wood filler
- Coat hooks
- Doors
- Hinges
- Door knobs
- Banding
- Wood glue
- Caulk
- Shim
- Level
- Primer
- Paint
- Paint sprayer
- Orbital sander
Shop the affiliate links of my tools here.
Create a Mudroom Design
There was plenty of room to create custom mudroom lockers in this open space next to our hall half bath. I wanted each family member to have their own storage area for a cleaner mudroom area.
As you can see from the drawing, I didn't use a fancy software to create this built-in look. I simply utilized the room dimensions to create the detailed plans for lockers with lots of extra storage.
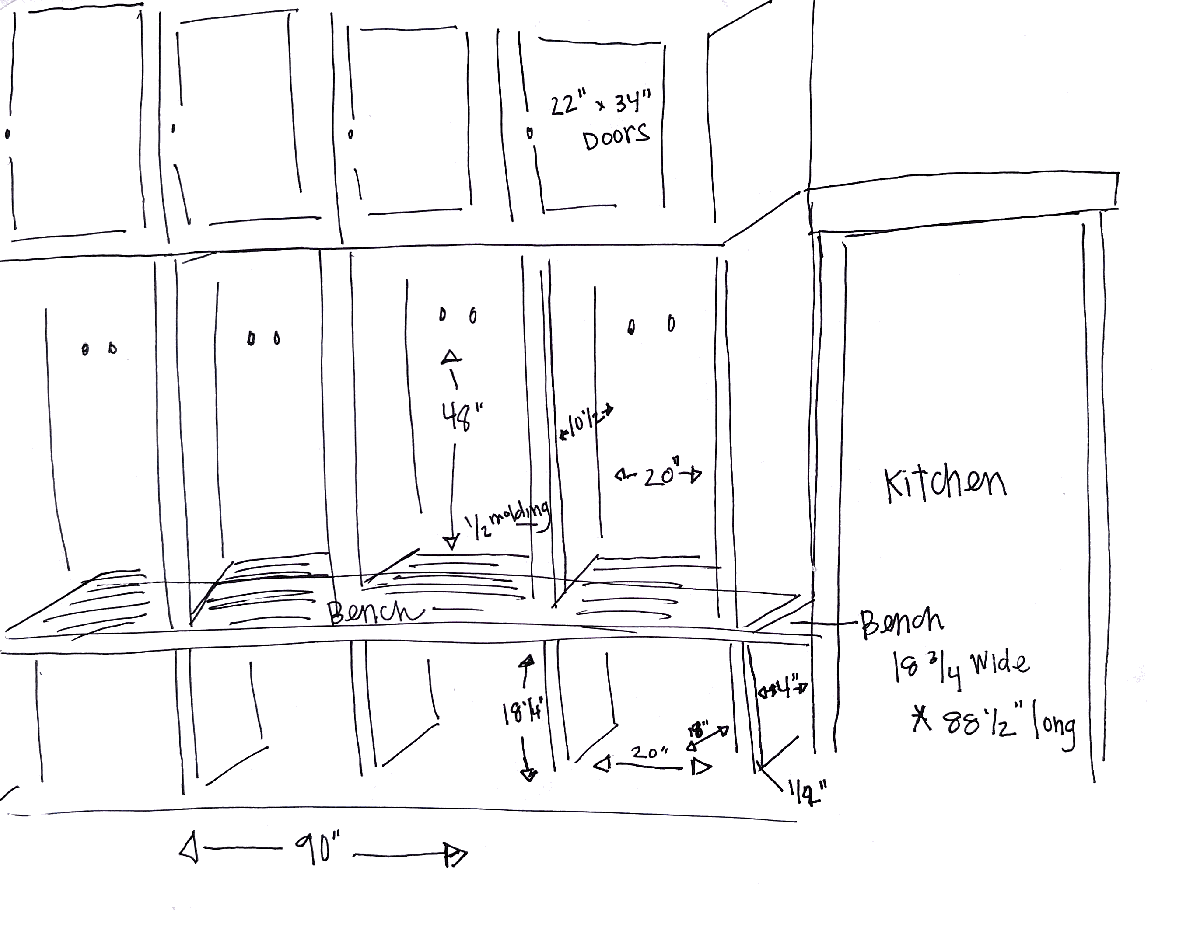
Dimensions for Locker Building Plans
- Entire wall is 90" long
- Bottom cubby side pieces measure 18"x18"
- Cubby dividers are 1 ½" thick. I used two cubby sides and a ½" filler strip to make them 1 ½" thick
- Finish trim - 1 ½" wide x ½" thick on the outside edge of the cubby
- Each cubby has a 20" opening.
- DIY mudroom bench seat measures 88 ½" long x 18 ¾" wide
- Locker main cubby side pieces measure 48" tall x 10 ½" wide - each divider is also 1 ½" thick
- Upper cabinets at the top of the lockers measure 22" wide x 34" tall
- Upper cabinet doors measure 22" wide x 34" tall
Continue following the post and pictures below for more guidance on dimensions. You may have to tweak your measurements as you build. That's totally fine if you have flexible space to do so.
Build a DIY Mudroom Locker Bench
Remove Existing Board
First step, take off the existing base board. I was very careful, as I want to use the whole thing again.

Tip for removing base boards: run a blade along the top of the molding to break the caulk seal. Then use a crow bar to carefully pry the molding away from the wall.
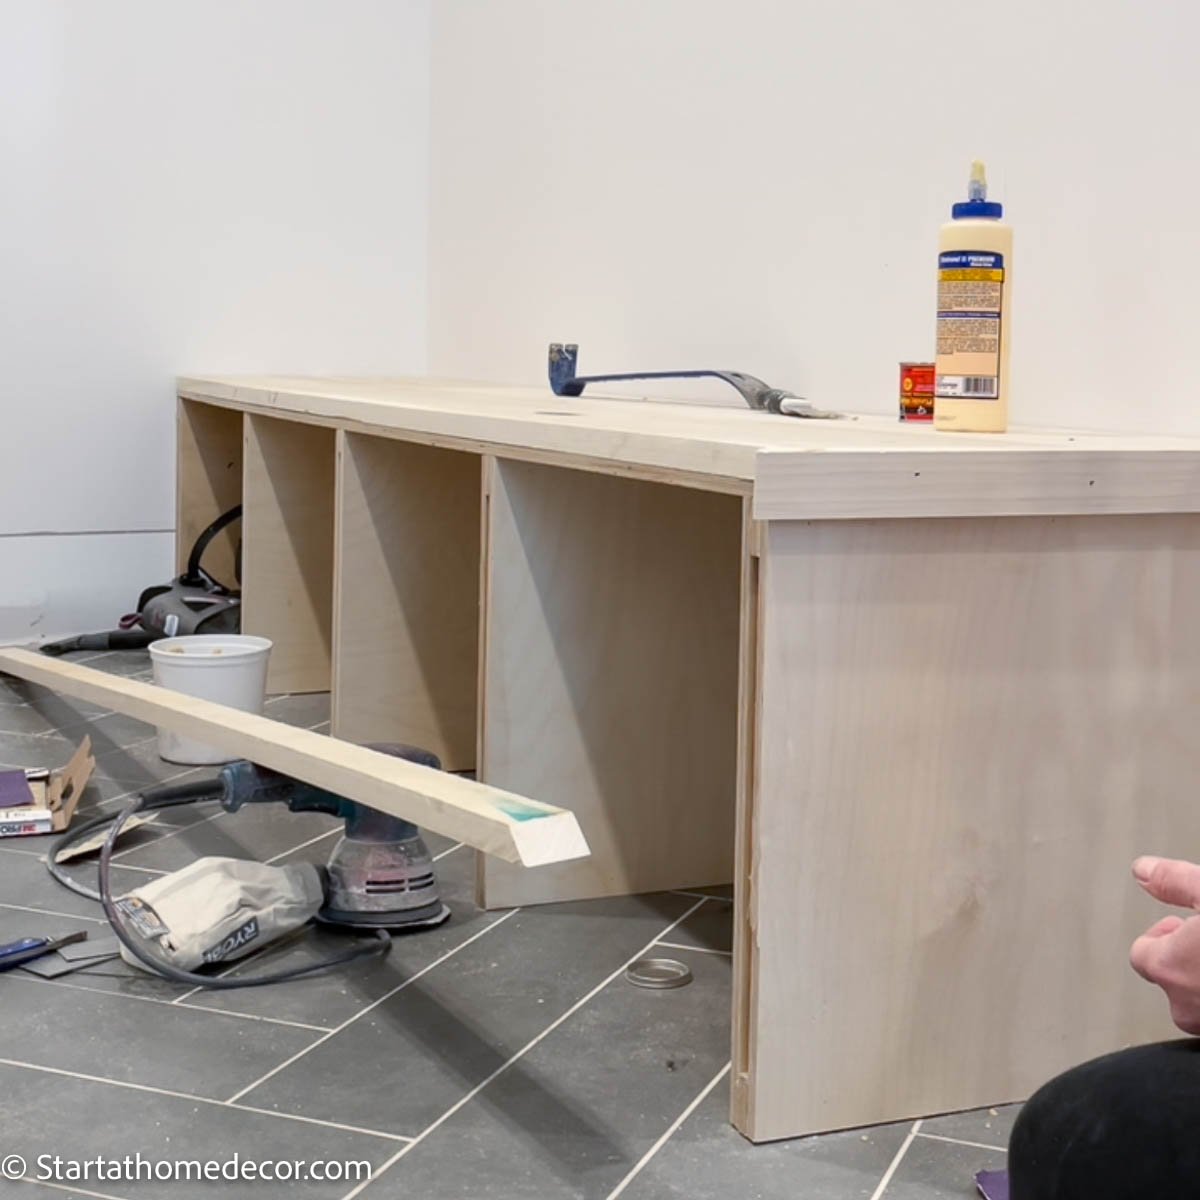
Cubbies
Then, cut your sheet of plywood down to 18"x18" squares. This is what I am using as cubby dividers for the lockers. I wanted the dividers to be thicker than ½" so I used two of the plywood squares and scrap pieces of ½" thick plywood in the middle. This makes my dividers 1 ½" thick. To finish it off I will add molding over the top.

I cut the base board that I pulled off down to 20" wide sections. This is what I will use to space my cubbies. To secure the dividers, nail them into the base boards. Then, nail to the wall. I used scrap pieces of wood in the front to help keep my spacing right.
Bench Top
Next, add a sheet of plywood for the top of the bench. I nailed it down through the plywood into each divider for added strength.

Now you can add the poplar on top to finish off the bench. Butcher block would also be a great option for a bench top.
To help make all the lines pretty I added a trim board of poplar around the outside edge. It's the little things that make a difference! At the corner I cut a 45 degree angle so all my front edges are nice and pretty. This will also give me something to run my molding for the dividers into.

Building the Mudroom Lockers
To build the lockers on top of the bench, I used the same strategy as the bench to build the locker dividers, but on a bigger scale.

The dividers measure 48" tall x 10 ½" wide. To space my dividers I used scrap wood on the back. This is also what the dividers get nailed into for added strength. And for even more additional strength, I added one of the plywood strips where I want my coat hooks eventually.

Once that is done, this is a great place to use a vertical shiplap to cover it all up, especially if you are going to have open mudroom locker cabinets. I nailed my vertical shiplap into the scrap wood on the back.
To make everything look pretty, use caulk to hide any gaps and wood fill to hide the nail holes.
Painting the Lockers
Now it is time to paint. (check out my painting tips here). Tape off everything that you don't want paint on. I used my Graco paint sprayer to apply the paint. I am using the color Chalked by Benjamin Moore. You can see I also had my kitchen cabinets painted in the same color.

After the paint was all dry I added these fun hooks from Amazon. Two hooks in each locker are almost as good as a coat closet to hang up a few things.

You can stop at this point and have beautiful mudroom lockers with a custom look. I wanted to add some closed storage to hide all the dirty stuff on top of the lockers.
Building the Upper Cabinets
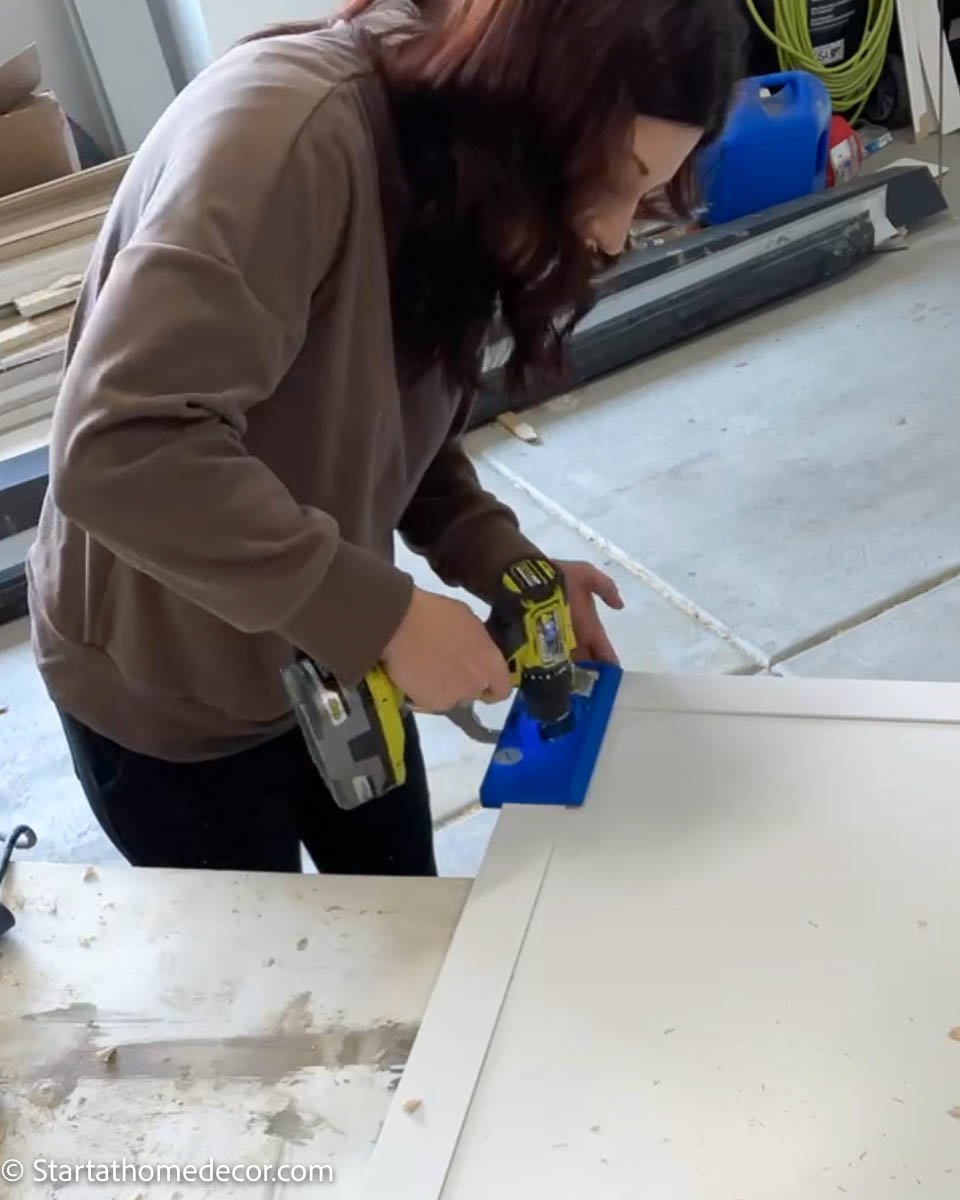
For the cabinets, I first built my boxes. Cabinet boxes can be a little tricky, but there is a secret. Use a speed square to make sure your boxes are 100% square.
To connect the sides of my boxes together I used a Kreg jig to make pocket holes. I put the pocket holes on the outside of the boxes so they are hidden once installed. To make it even stronger I glue them together as well.

For the back of the cabinets I used ¼" thick plywood and pinned it to the back of the boxes. I also added a piece of wood to the top and bottom of the cabinet boxes. They are for added support pieces. I will also use them to secure the cabinets to the wall.

I made stationary shelves inside the cabinets. The pro to this is added strength. The con is that you can't move them. I had previously found some bins I wanted to use in the cabinets and used them for spacing on the shelves.

Installing the Cabinets
Now it is time to install the boxes on top of the DIY mudroom lockers. You are going to want shims and a level for this step. Find your studs and then use your shims until your boxes are 100% level. If they are not, your doors won't fit or close very well. This step isn't hard, so just take your time and make sure to get it just right.

Cabinet Doors
I really hate to make doors so I found a great place to order pre-made doors. Once the doors arrived, I got them all painted and used my Kreg jig to drill for the hinges.
Devin helped get the doors hung on these mudroom cabinets. This job is much easier with two people. One person to hold the door, the other to drill the hinges on.
Once the doors are on you can install cabinet door knobs. I would suggest waiting to add your hardware until after everything else is installed. That way you can make sure your knobs are 100% level with each other.
Crown Molding
Last but not least, add the crown molding. This is a great way to finish off the space. I have found it is the little details that bring the project together and create the perfect space.
To install crown molding, add 2x4 blocks to the top of you cabinets. You will use these blocks to attach the crown molding to around the top of the cabinets.
Final Reveal
There you have my DIY mudroom lockers! Everyone has their own place for additional storage space. We can also use the baskets under the bench for shoes.
My kids hang their coats and backpacks on the hooks. The cabinets are used for seasonal items such as mittens, hats, scarves and swimming stuff. Or, let's be honest, anything the kids can shove in there.
I love the details of this area. My walls are painted in Snowbound by Sherwin Williams and they look really great against the white cabinets. You can view my post on choosing a wall color here. Plus, don't miss my awesome herringbone flooring.

DIY Mudroom Lockers You Will Love
Building your own DIY mudroom lockers and bench is easier than you think. Take it one step at time in stages and don't get in a rush. An organized mudroom will make a world of difference for your design space and you will be so happy when it is all done. I guarantee it!
Loving these DIY built-in options? Try out my others here!
- DIY built-in entertainment center in family room
- Easy built-in bunkbed
- Custom built-ins around a window
- Corner shelf
- DIY closet built-ins
Happy Building!
Brooke
Leave a Reply