
How to install a stunning shiplap ceiling to add unique visual interest to your space.
When it comes to wall treatments, you've seen plenty of different styles. From wainscoting to wallpaper, there are a plethora of options out there. But what about ceiling accents? An affordable painting shiplap ceiling is a popular choice to create a big impression.
As I was designing my kids' rooms in our new home, I wanted a fun element to incorporate into each bedroom. With a wall mural in one room and a boho wall in another, a fun accent ceiling seemed the perfect style choice for our third bedroom. A stunning DIY shiplap ceiling in charcoal creates the best dramatic impact.

Why I Love Shiplap Ceilings
Using shiplap is a great way to cover up popcorn ceilings in an old home, or any ugly ceilings for that matter. If your ceiling does have a heavy texture I would recommend smoothing it out as much as possible. This will allow the shiplap ceiling planks to fit tight against the existing ceiling.
Shiplap on the ceiling is perfect for any room, whether it is a bedroom or living room. It provides a neutral finish while also adding character and creating a stunning focal point. Adding shiplap to the ceiling and painting it a charcoal color was the perfect solution for this space.
Supplies for a Shiplap Ceiling
These are standard supplies and tools you can find at your local home project store.
- MDF 8" shiplap - a thriftier option to real wood paneling and looks great
- Chalkline
- Nail Gun
- Miter Saw
- Jig Saw
- Ladder
- Crawford's Spackling putty
- Sandpaper -150 Grit
- Graco Paint Sprayer
- Graco Extension tip
- Paint - Peppercorn by Sherwin Williams in Eggshell or you can also leave it as a white shiplap ceiling
Easy Installation for a DIY Shiplap Ceiling
Any DIY projects that involve work on a ceiling means that your arms are going to be tired. Working above your head is hard work, but the finished look is worth it because it adds so much character. Go slow and do a little bit at a time! This is also a two person job so make sure to have an extra set of hands available.
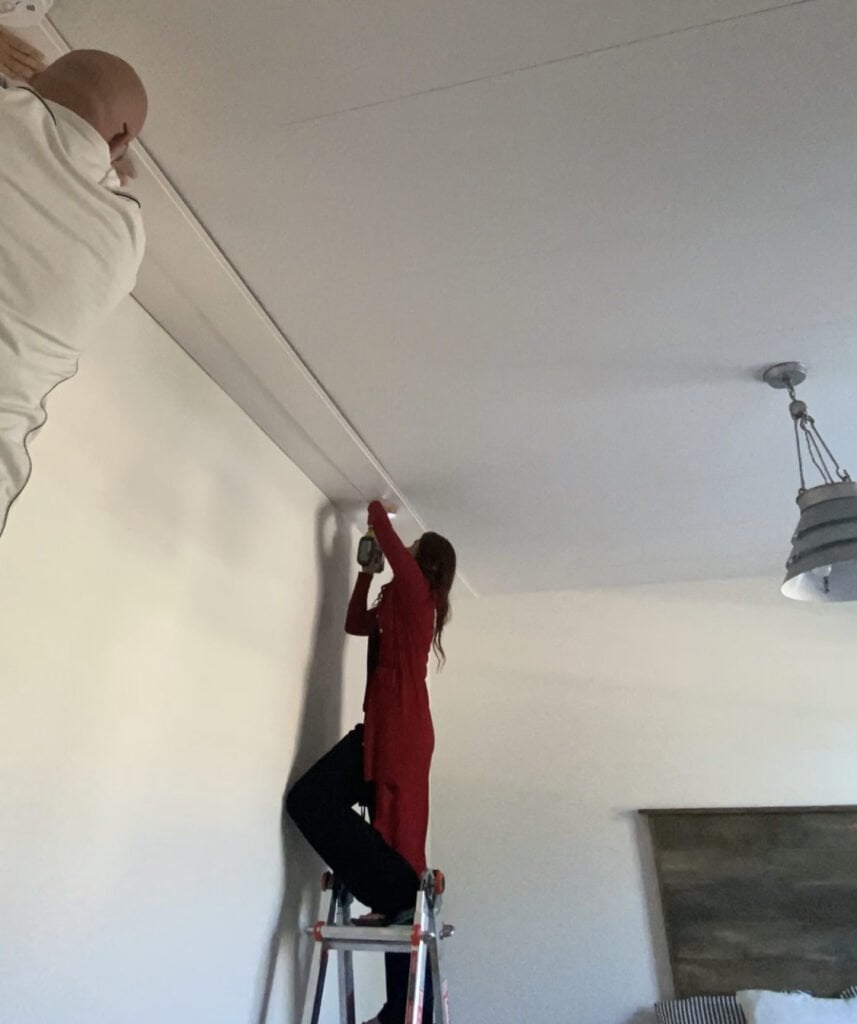
Find Ceiling Joists or Floor Joists
- Use a stud finder to find your joists
- Mark joists with nails and use a chalk line to mark
The first thing you want to do is use a stud finder to find your joists along the ceiling. Once you find the joists, mark them with nails on each side and then pull a chalk line across to mark them.
Tip: You will need to nail your shiplap into wood so it will hold. If you nail it only into the drywall it will sag. Another option is to use liquid nails, but if you ever want to remove the shiplap it will destroy your ceiling. We only used nails and have not noticed any sagging.

Hang Your Shiplap Boards
- Use a step ladder or barstool for each person to hold planks in place
- Place the top overlay hitting wall and bottom groove on the outside
- Nail into bottom groove and place next piece over the top of groove
Start at one side of the room with your first board and work your way to the other side. It is a good idea if the top overlay butts into the wall and the bottom groove is on the outside. This will provide a clean line along the wall.
Then you can nail into the bottom groove and place the next piece of shiplap over the top so it will cover the brad nails. This gives a cleaner look and less wood filler to sand off.
It is easiest to have a step ladder or a barstool set up for each person to climb up and hold the shiplap in place while it is nailed up.
Since our ceiling length is longer than 16' we used straight cuts and butt the next board right up to the other as tight as possible. Eliminate any gaps for cleaner lines.
When you get to light fixtures, you can use a jigsaw to cut out the circular perimeter.
Tip: Your pieces of shiplap should be as long as possible so you have less seams to fill. We are using 16 foot pieces of shiplap planks and a Ryobi nail gun to secure the shiplap.
It took us about 4 hours to hang all the wood planks. What's not to love about the classic look of a white shiplap ceiling. But when you get to pick the color of your choice, why not go bold?

How to Paint Your Shiplap Ceilings
Prepping for Paint
- Fill nail holes and seams
- Sand with 150 grit sandpaper
After hanging the shiplap, fill in all the nail holes and seams with Crawford's spackling paste. Once the paste is dry you can sand everything down until it is nice and smooth. A light grit sandpaper is a good option for this.

Painting a Shiplap Ceiling
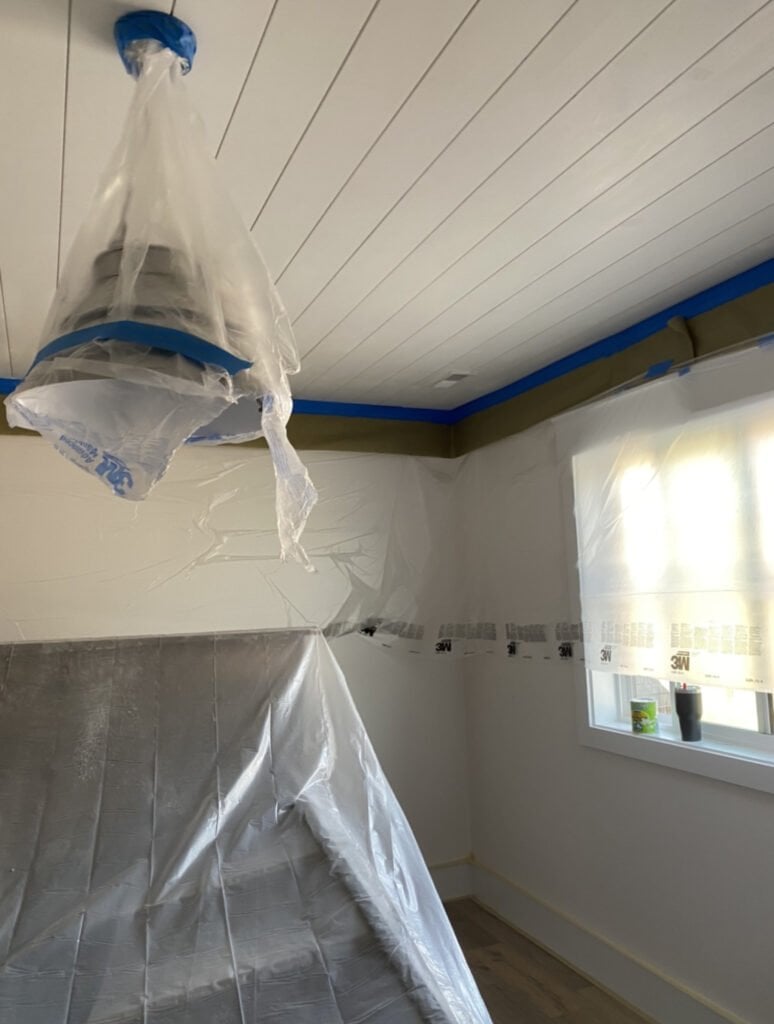
- Tape and cover furniture, doors, windows
- Prime if needed
- Paint away!
White walls are great, but with this high ceiling, I really wanted to add some color for a striking contrast. I used a paint sprayer to get a smooth and even finish for this shiplap project. When spraying above your head overspray gets on EVERYTHING! Make sure you tape off anything and everything you don't want paint to get on. I also use a drop cloth to cover all the furniture. This paint sprayer is a great option.
The MDF shiplap boards were already primed so I went straight to the paint. I am using a Graco Magnum x-7 to spray my ceilings. An extension nozzle is the best way to spray it from the ground.
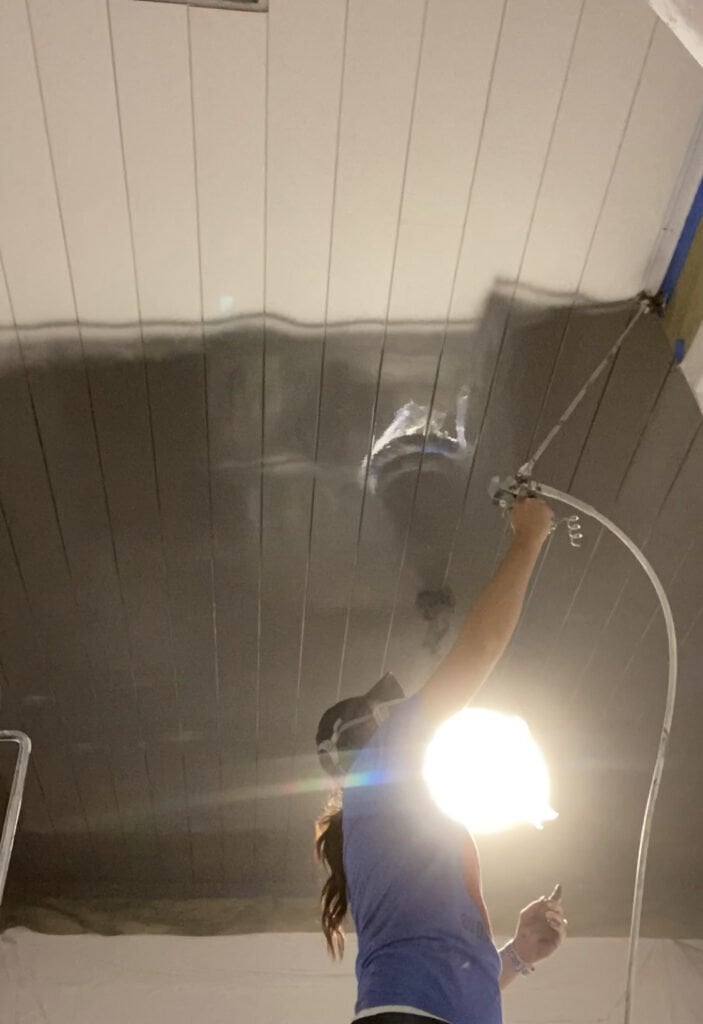
Using the sprayer in different ways helps to cover the entire ceiling. Spray 2 coats going against the shiplap. This helps to make sure all the cracks in the shiplap are covered. Then spray 2 coats following the lines in the shiplap. I used about 2 gallons of paint for this project.
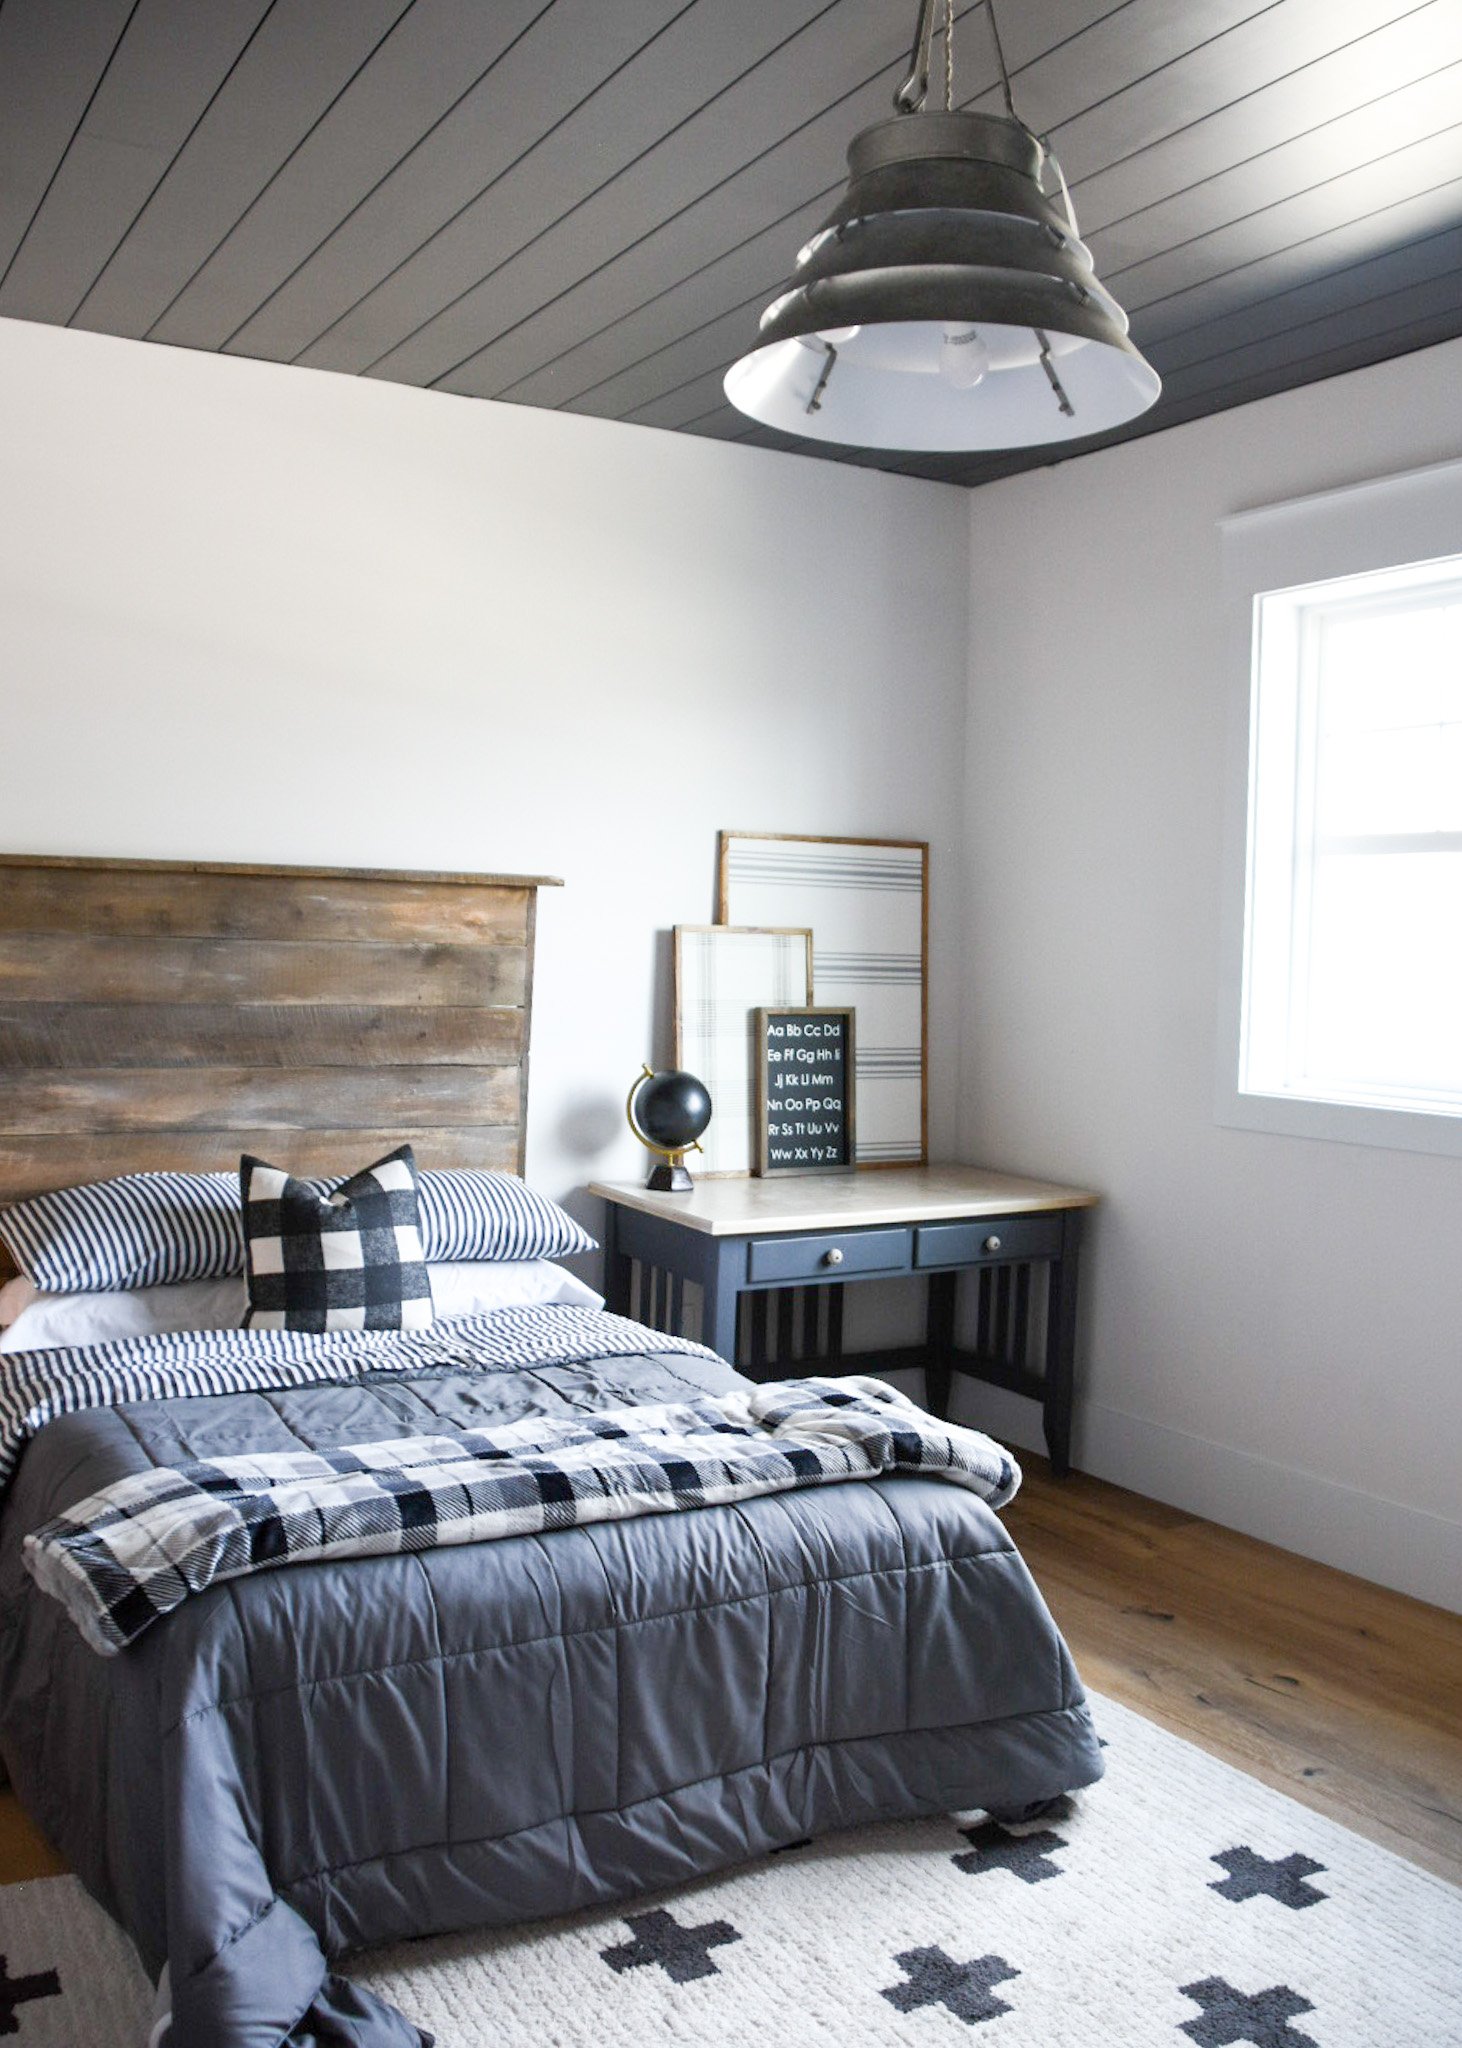
The shiplap ceiling is done! It's amazing what any type of accent walls (or ceiling) can do for an entire space. You can also try this design on a drop ceiling or a vaulted ceiling. I love how much character impacts the rest of the room, regardless of ceiling height or room size. Check out what else I built for this room.

Shilap Ceiling Idea for Your Own Home
Do you love the look of shiplap? Adding a ceiling treatment like this is a great way to create contrast and visual interest in a room, large or small. Plus, who doesn't love a stunning focal point on their ceiling? Invest in that extra step and create a room you will love with texture and design. You can also see how to make a thriftier alternative for my shiplap wall here!
Happy DIYing!
Brooke


Leave a Reply