
Spruce up the front entrance in your home with a beautiful traditional wainscoting entryway.
Are you looking to add some charm and character to your entryway? DIY wainscoting is a great way to embellish your wall space. Traditional wainscoting has been around for centuries and continues to be a popular choice among homeowners looking to add a touch of elegance to their interior walls.
In this article, we'll dive into creating a beautiful wainscoting entryway that is affordable and functional. So grab your tools and get ready to elevate your home's design style with a much-needed makeover.

Why I Love Wainscoting
There are a few who don't love the look of traditional batten wainscoting. It is a stunning way to create a timeless look in any room, whether that is a home office or living room, and without being overbearing like a bright paint color. I also love that it can be easily customized in different styles, like with using beadboard wainscoting or simple flat wood panels. You can opt for wainscoting on your lower walls or entire wall. And best of all, it is easy to create a wainscot wall yourself.
Supplies Used for Wainscoting Entryway
Most of the pieces I used were scraps from casing our doors which really helped the budget. However, Home Depot or your local supply store should also have what you need.
- Baseboards - ½ " thick
- Batten wood (vertical) - ½ " thick
- Casing for the middle piece - ⅝" thick
- Header material for the top (horizontal)
- Level
- Measuring tape
- Nail gun by Ryobi, 16 gauge
- Ryobi miter saw or this one with the stand
- Ryobi sander
- Spackle
- Caulking
Shop all of my favorite tools here
You can also see similar wainscoting ideas here in our downstairs powder room but with using different products.
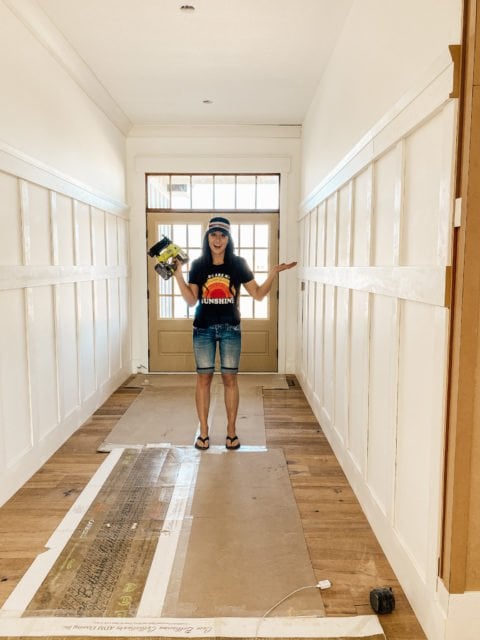
How to Build a Wainscoting Entryway
Follow along to see how I created my own DIY wood paneling look in my front entry. I love white walls and so these wood accents add a beautiful visual interest.
Install Base Molding
First, measure and cut your baseboard and install it with a nail gun. My baseboard is ½" thick.

Bottom Batten
Next, you'll want to measure and cut out all of your vertical batten slats that are on the lower portion of a wall. I spaced mine 16" apart and they are all 42" tall. It doesn't have to be perfect because you can cover up very minor imperfections and nail holes with caulk, but you'll want it pretty close. My batten boards are also ½" thick so it creates a flat panel.

Don't forget to use a level as you nail these pieces to make sure all of the vertical slats are the same.
Install Middle Casing
Then cut and install the middle casing. This piece was 6 ½" tall and ⅝" thick.

Top Battens
After the middle casing is installed, cut and install more vertical batten slats for the upper walls. I wanted these to be different sizes from the bottom length, so I cut these to be 21" tall. And again, spaced 16" apart.
Header for Wainscoting Entryway
The final piece to install is the header for the top rail. This header is also 6 ½" tall, but you can really use another piece of casing or header that you prefer to complete your desired look.
Finishing Touches
When everything is installed, pull out your spackle for all of the nail holes. Sand and wipe everything down before caulking. Before you paint, look at your color options. You can paint your wainscoting the same as your wall color, or choose a different color. I have used color on wainscoting in two powder rooms, one wall green and another wall black. They both look stunning! I really wanted this front entry to be a bright space and kept it all a soft white wainscoting.
For more ideas on DIY wood wall treatments go here.

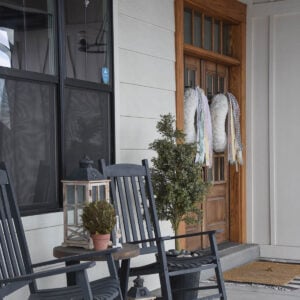
Completed Entry
The finished entryway! Look at how these architectural elements really dress up the space. Waincoting was the perfect choice!
To add a splash of color I found this beautiful rug . It adds that vintage cottage feel I was going for and is so soft on the feet. To keep this rug from moving around I used a dual purpose rug pad, also from Mohawk. This pad keeps the rug in place and adds a bit of cushion too.

It is always fun to change up the decor too.

Easy Wainscoting Entryway
To avoid a dull abode, why not try sprucing up your interior with a lovely wainscoting entryway to make your home warm and inviting? Creating a custom detail like this will add value and embellishment to your space. So give it a try and take your home from blah to beautiful with a stunning wainscoting wall to impress all of your guests.
Happy DIYing!
Brooke

Leave a Reply