
Customize bedroom space with a DIY Queen Size bunk bed. Check out these 17 easy steps to build a twin and queen bunk bed frame.
Have you ever found yourself crammed for space in your home, especially when it comes to accommodating guests or growing children? Or perhaps you're just looking for a creative way to maximize space in your kids' bedroom? Imagine having a trendy, functional and space-saving solution at your fingertips. Enter the world of DIY built-in bunk beds - the perfect solution for limited space.
With detailed instructions and a simple design, you can transform your space into a practical and stylish haven for kids and teens. So, get your tools ready and let's dive in to building your own bunk bed.

Boy Bedroom Before
After moving into our new home, we tackled a few projects like this shiplap ceiling and building a new modern nightstand for Little Buddy's room. However, he really wanted a new bed. Customizing a bed for our needs with this space was the best option.

DIY Built-in Bunk Bed in 17 Steps
Step 1: Pick a Bunk Bed Design
There are so many different DIY bunk bed ideas out there so it is important to know what you want. I knew I wanted two possible sleeping areas with a twin bed and a queen bed because we do not have any guest rooms. Little Buddy also has his own bathroom so by adding extra sleeping space his room it is the best solution for a guest bedroom.
I also wanted a bunk bed design that could grow with my child. The high opening makes that possible, and the bed doesn't feel too closed in.
Step 2: Measure Your Space and Design Bed
After measuring my space, I opted to put a twin bunk bed on the top and a queen on the bottom bunk.
Top Bunk - Twin Loft Bed
Instead of putting a twin size mattress on the top bunk, I am using this space as a loft for my son. This will give him some extra space to play in his room.
However, the top will still be big enough for an optional standard twin mattress when needed. When measuring, make sure that you have plenty of room between the ceiling and top bunk to do this. Our ceiling height is 9'. By making the bed 59" tall this gives him plenty of room to play on the loft or for someone to sleep.
Bottom Bunk - Queen Platform Bed
There is a lot of floor space in this bedroom, so I opted to turn the bottom bed out and facing the room. This is really helpful to making it feel less like a bunk bed, especially if you don't love crammed spaces or get claustrophobic. Plus, it is much easier to change sheets and bedding on a bunk bed like this. If you space is not quite as big you could save some space and do a full bed instead.
Step 3: Gather Supplies
Materials List
- 2x4s - common construction grade pine
- 2x6s
- 8" MDF shiplap
- Finish molding
- 3" x 10' Pine
- ¼" MDF
- Pine corner molding
- Peel and stick vinyl flooring
- Wood filler - Home Depot
- Wood glue
- Brad nails
- Stud finder
- Pocket hole jig
- Pocket hole screws
- Blue tape
- Caulk
- Painter's paper
- Paint sprayer - Graco (my favorite sprayer)
- Paint- Peppercorn by Sherwin Williams
- Wood stain - Providential by Minwax
- Framing nailer - if you don't have a framing nailer, use a drill and screws
- Drill
- Circular saw
- LVT flooring
- Exacto knife
- Speed square
- Level
Step 4: Build the Walls for DIY Built-in Bunk Bed
Storage Walls
Start in the corner and build two walls connecting together at a 90 degree angle. The front facing wall is 30" wide x 53 ½" tall and the side wall is 41" wide x 53 ½" tall.
The walls will be the base of the bunk bed that hold the weight. Pull out your stud finder and make sure they are secured to the studs in the wall. You can always adjust dimensions slightly to make sure you can attach your 2x4s to studs in the wall.
This is the area where the ladder goes as well as the built-in shelves for some bed storage. Adding a storage area for books or other things is a great option if you have limited storage space.
Tip: When framing out a space your 2x4s should be a maximum of 15" apart. Or 16" on center, as framers say.

To accommodate the extra storage in this small space, I blocked out an area for built-in shelving in between the 2x4s. I did alter plans slightly later on to fulfil Little Buddy's special request. Detailed plans below.

Opposite Side Wall
The next step is to build the wall on the other side. This wall will be a single wall of 2x4s that measures 41" wide x 53 ½" tall.
Step 5: Build the Top Bunk Floor
When your walls are done, it's time to start with the top bunk flooring. Start by adding a 2x6 along the back wall. This 2x6 rests on the 2x4 walls and is then screwed into the studs on the back wall.

Continue running 2x6s all the way around the bed, creating the main bed frames of the twin mattress bed. Attach them together with screws or a framing nailer.
Next, add the floor joists. We spaced these 16 inches apart and ran them across the entire floor. To attach them we used wood glue and nailed in from the front and toe-nailed the back boards.
Tip: Toe-nailing is when you nail or screw two perpendicular boards together at a 45 degree angle.

Step 6: Add Flooring to the Top Bunk
After the joists are installed, add an OSB piece of plywood to the top bed frame of the wooden bunk bed. I also figured out where I wanted my railing to go and put down the 3" pine shoe molding. This is what the side rails will sit on. Having my railing sitting on top of and attaching to wood will make it much stronger.
Now add the LVT flooring. This is a floating floor so I am butting it up to the wall and the railing shoe for a nice clean finish.

Step 7: Build the Bottom Bunk
Now that the main structure is built and secured to the wall it is time to make the bottom bed. The following measurements are the basic design for a queen bed.
Cut two 2x6s down to 81" long. These will be the side rails for the bed.

Cut five 2x6s down to 61" long. These will be the mattress slats. I then screwed the slats down. I didn't want removable bed slats as it takes away from the overall bed strength.
After I had the slat supports attached to the side rails I wrapped the bed frame with ¾" thick MDF. This bed frame is mobile, which is a good idea to help with placement and cleaning down the road.
Step 8: Adding Electrical to the DIY Bunk Bed
There are a lot of different options when it comes to adding lighting to the bed area, but I decided I wanted to have something a little more permanent. This is completely optional, but works well for our simple bunk bed with easy access to electrical.
I hired my neighbor to come add some sconces on each side of the bed. They have their own light switch on the side of the wall supports. I also put an outlet in the built-in shelves. This way you can charge a phone, watch or plug in a clock.

Step 9: Add Railing Posts
Now it's time to add railing posts. These need to be strong and durable because the railing is drilled directing into these. Glue two of the 2x4s together and then screw them together for added strength.
Use a kreg jig to create six pocket holes on the outside of the 2x4s. Next, add glue to the bottom and screw 2" pocket screws down into the pine shoe.

For a professionally finished look, wrap the 2x4s with ¼" MDF and use a brad nailer to attach it.

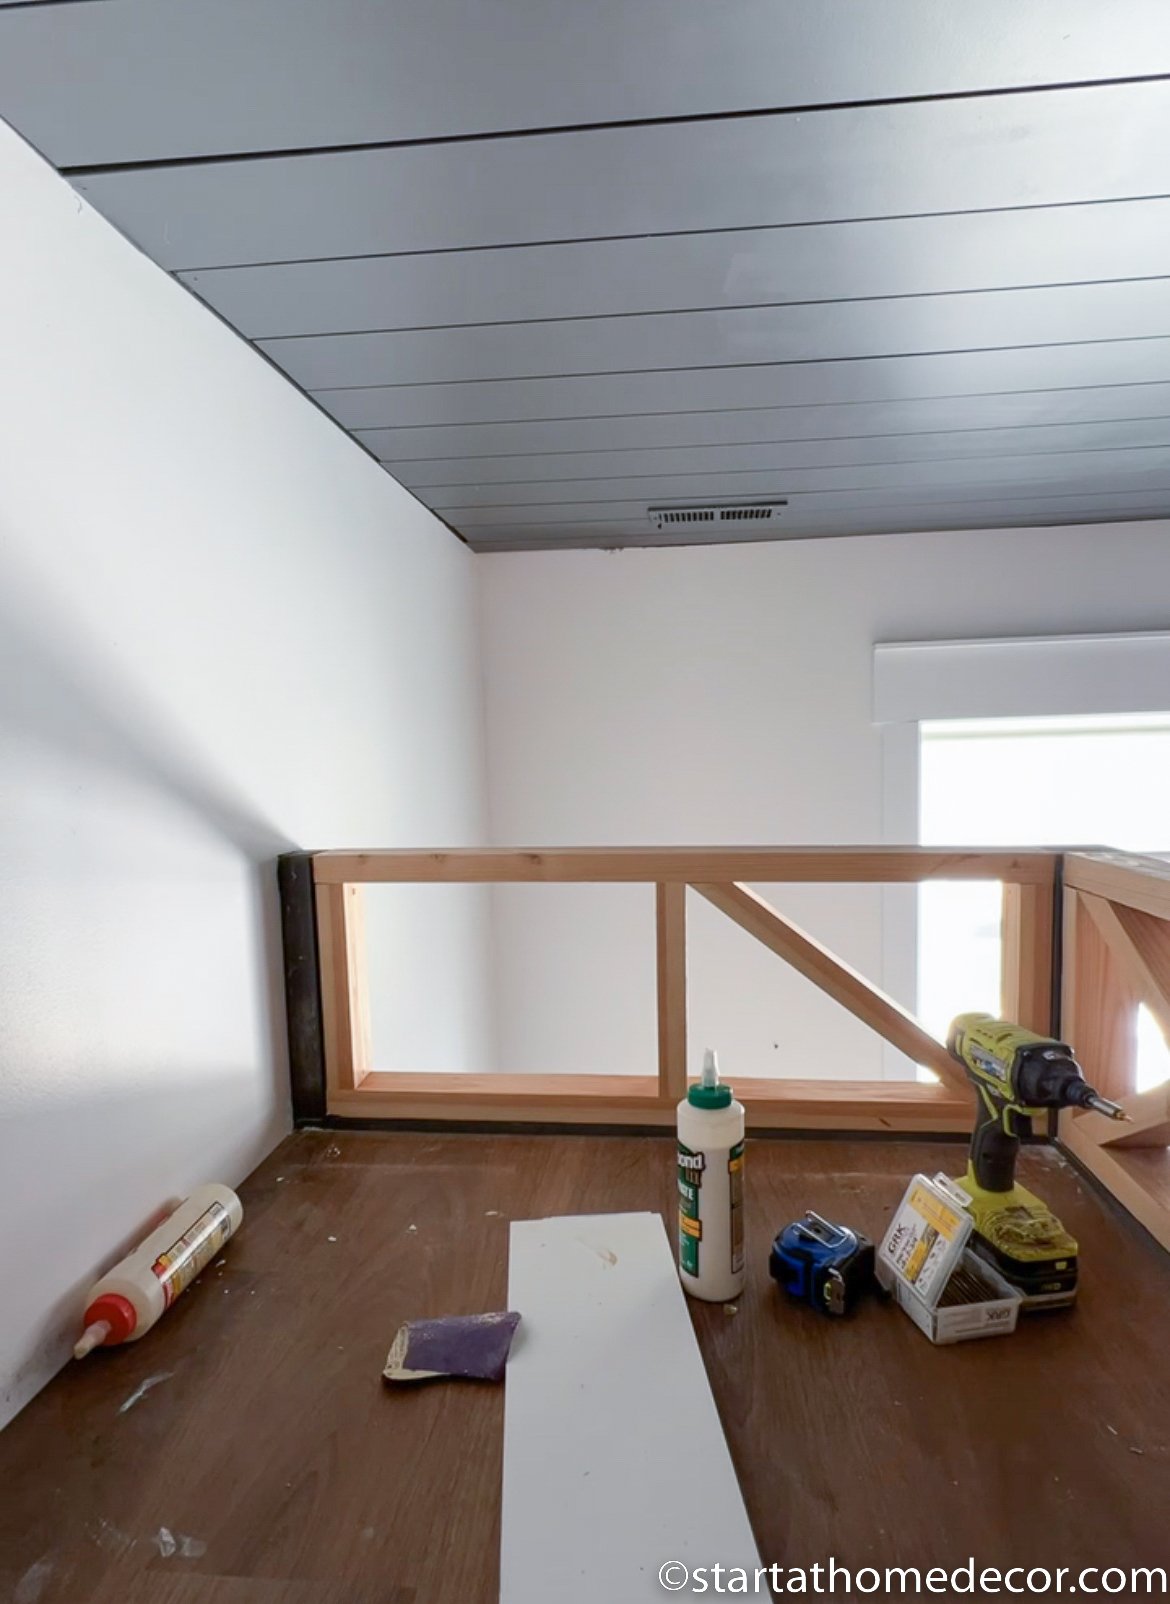
Step 10: Molding and Vertical Shiplap
And now it is time for my favorite part of the DIY built-in bunk bed. Adding moldings and shiplap.
Tip: Before adding your moldings, think about how everything will come together. For example - I am putting shiplap on the bottom of the top bunk, so there will essentially be shiplap on the "ceiling" of the bunk space. The trim piece I am putting on the front needs to hang down far enough to cover the shiplap.

Once the ceiling shiplap was on I added shiplap to the walls and ran them from floor to ceiling. Make sure to carefully cut in the right place to work around electrical outlets or lights. To get nice clean lines, add base molding around the bottom and a small quarter round piece on the top.
For the outside corners, use a wood corner mold. This will hold up the best and give it a nice finish.

Step 11: Add a Secret Door to the DIY Bunk Bed
In my original step-by-step plans, I had only planned on putting in built-in shelves for storage. However, Little Buddy kept insisting that I couldn't cover up his hiding spot. So I changed this DIY project last minute to allow him access to his hiding space.
I made built-in shelves out of 2x6s. Instead of leaving them as standard shelving, I put door hinges on the back of the shelves to create a secret door that could open up. This door swings in, so once it is closed no one will know it is there. What kid doesn't love a secret hiding space in their room?

Step 12: Prep for Paint
Once everything is enclosed, you can prep the furniture for paint. Use Crawford's spackle and a putty knife to fill all the nail holes. Once it is dry, sand all of the excess spackle off so your surface is smooth. This is a very important part of the finishing process.
While the wood fill dries, caulk the seams. To do this, run a small bead of caulk along the cracks. Use your finger and a damp cloth to smooth the caulk out and remove excess caulk.
To prepare for spraying paint, first vacuum the floors and moldings to remove dust. Then, run painter's tape all along the floor edge. Next, roll out paper onto the floor and tape it down to the tape you already applied. I know this sounds like overkill, but when you are spraying the air can lift the paper up. It helps to stick tape to tape.
I added plastic all the way to the ceiling too. Anything that is not covered will have paint on it. So make sure you protect everything that you don't want paint on.
Step 13: Painting the DIY Bunk Bed
Grab your favorite paint sprayer for this next part. I am using the Graco paint sprayer because it is my favorite to use, especially on furniture and cabinets. It puts out enough paint to get a good smooth finish. Keep in mind it does put out quite a bit of paint, so move quickly and evenly.
This bed is painted with Peppercorn in satin finish by Sherwin Williams. We opted to match the shiplap ceiling with the same color.

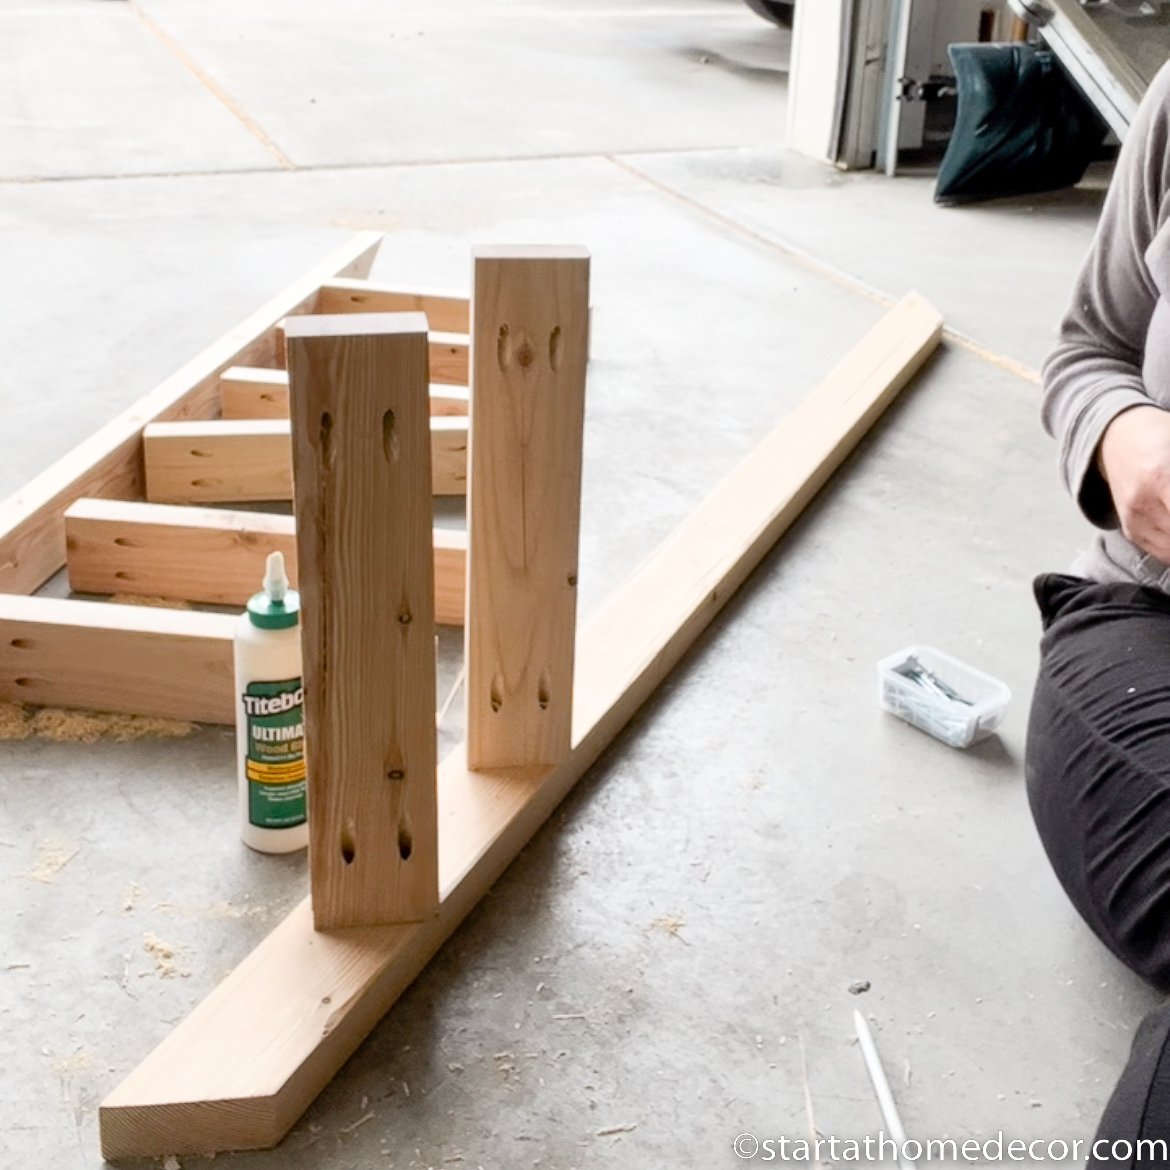
Step 14: Build Guard Rail
Don't attempt to build your guard rail until your paint is dry, unless you are painting it all the same color. To build the guard rail I am using 2x4s. A railing can been a great thing for incorporating a fun design element. I have been loving the look of Xs in railing and this is the perfect place to implement that.
First, build the outer frame, this will be the base of the bed rail supports.
Next, add the dividers. To figure out where to put the dividers, measure the opening and divide it by three for the front and two for the side. If your Xs on the front and side are a little different in size that's okay.
Then add your first X piece. To find the angle needed, hold the 2x4 up inside the frame to where it needs to be placed. Then, use a pencil to marked the 2x4.

Do the same thing for the additional Xs, but don't forget to mark the same center on each X. Otherwise the center of the Xs will not be lined up. After the final pieces are installed, you can stain or paint it. I stained it with Providential by Minwax.
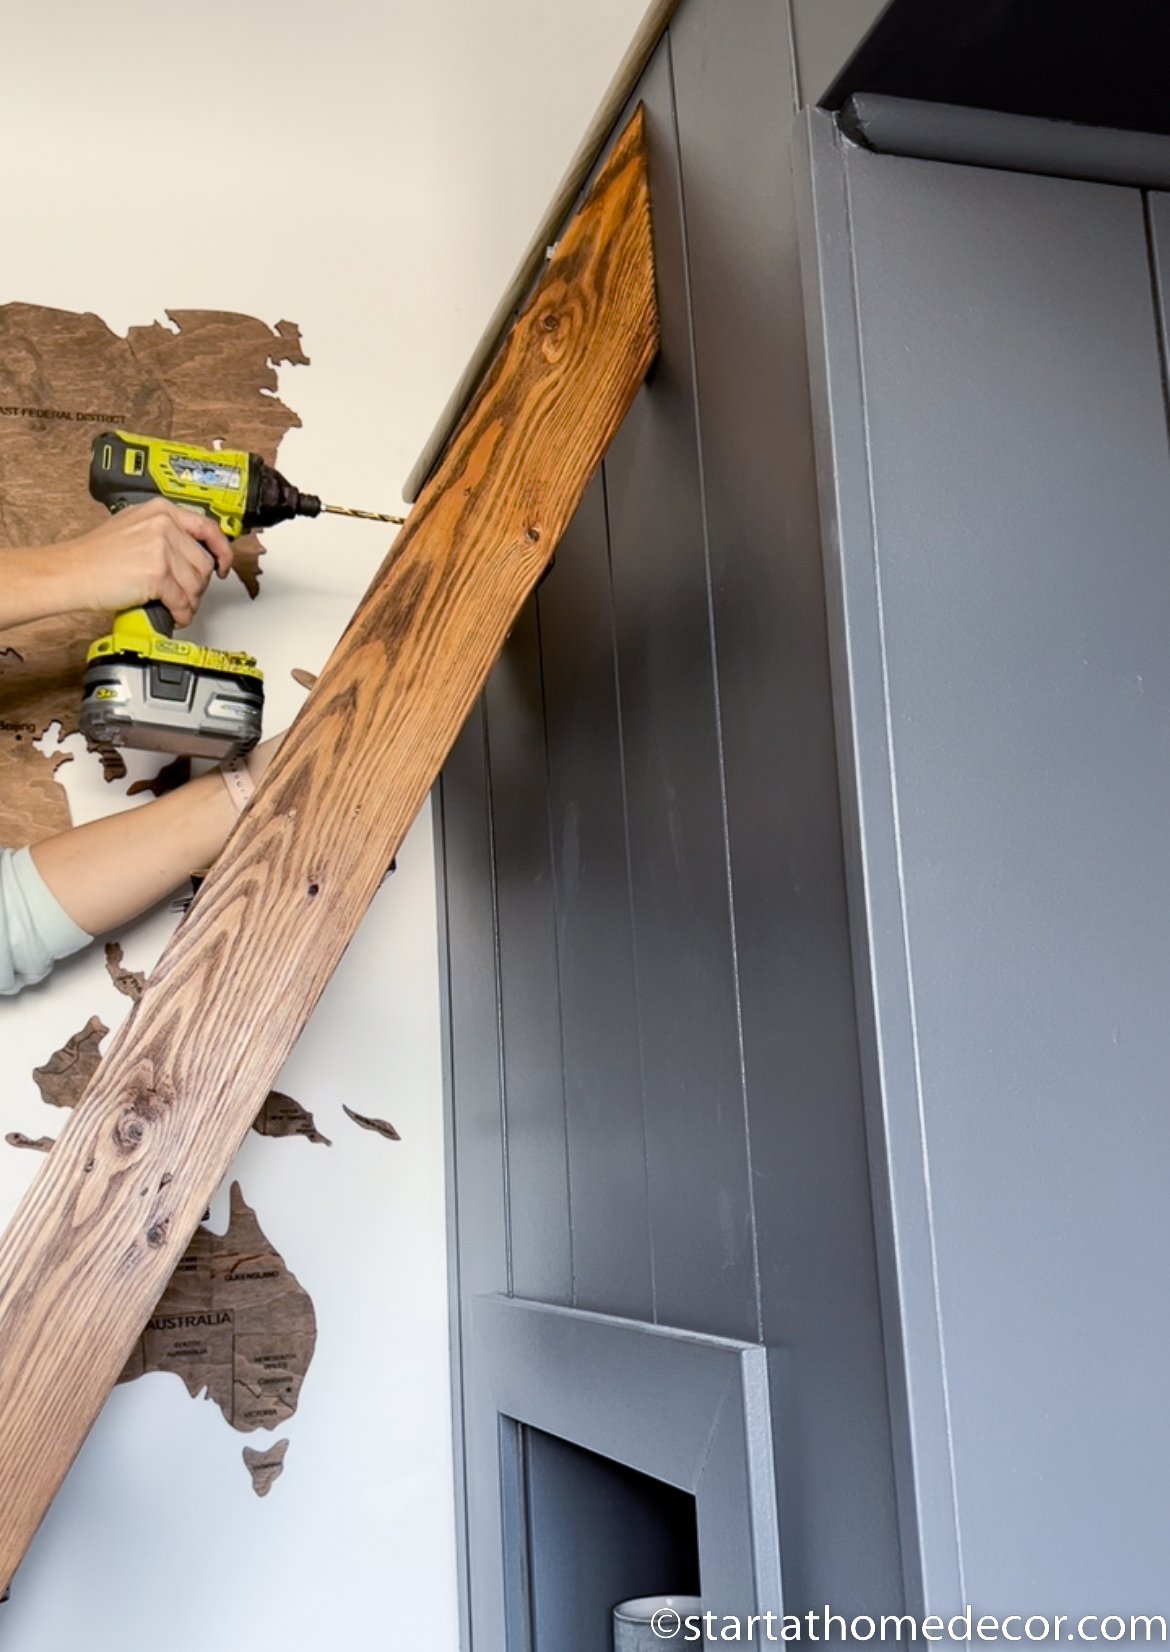
Step 15: Build the Ladder
Measurements
- Ladder sides are 77" long
- Top angle is 60 degrees
- Bottom angle is 30 degrees
- Length of the ladder rungs are 16" wide
- Rungs are spaced 8 ⅛" apart
Once everything is cut down, the next step is to add 2 pocket holes to each end of the rungs.
Then measure 8 ⅛" up from each side of the 30 degree angle. Draw a line to connect both measurements. This is where the rung will be placed. The rungs will be at a 30 degree angle. Once the ladder is installed the rungs will sit flat.
To attach my rungs I used glue and two 2" pocket screws on each side.
After everything is all put together, stain or paint your ladder. I stained the ladder with Providential stain as well. To attach the ladder, first pre-drill holes on the top of the ladder leg so the wood doesn't split. Then use long carriage bolts to attach it to the bed.
Step 16: Add Peel and Stick Vinyl
I wanted to do something really fun to finish off this double bunk bed. I found this fun peel and stick vinyl from DuraDecor. It comes in lots of different finishes and it even has a texture. Not to mention, it is super easy to install, just peel and stick.

For this project we went with the Harvest Distressed Wood. I love all the fun colors this one has in it and the grays matched his bed perfectly.
To cut peel and stick vinyl all you need is an exact knife and a speed square. Measure how long you want the piece. Using a speed square, score it with your blade. This will give you a straight cut. Then simply snap your piece, peel off the backing and stick it up.

I think it is safe to say this is one of my favorite DIY building projects to date. DuraDecor was the perfect design element to pull the whole space together. After finishing the wall space behind the bed, I decided to wrap a portion of the queen bunk frame in the peel and stick vinyl too, to bring out the wood tones in the room.
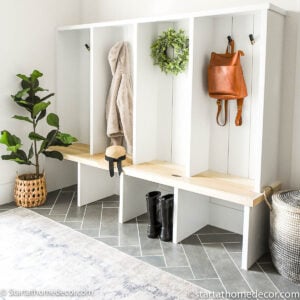
Step 17: Add Bedding and Decor
Now that the bed is done, it's time to finish off the room and decorate. Minimal decor is my preferred option. In my kids' rooms I find that too much decor turns into messy clutter. But bedding can add a lot to a space, as well as large art pieces like the map.
Bedding for the DIY Bunk Bed

Decor for Little Buddy
- Large map
- Books from a thrift store
- Cactus
- Small vases
- Rug


Desk Area
This desk used to be my husband's when he was a kid. I refinished it to match the room. To do this I bleached the top (tutorial here) and painted the bottom to match the bed.
Top it off with a lamp, chalkboard and pictures to blend the spaces together.
I am so happy with the finished product, it looks like a furniture item. Creating this DIY built-in bunk bed was a great way to save a lot of money. Plus, I do enjoy a good woodworking project and learning how to build new things. I hope these step-by-step instructions help you build the perfect DIY bunk bed.
Looking for some more bedroom inspiration? How about a little boho twist?

Or even add some wallpaper.

Happy Building!
Brooke

Sarah says
Love this design! Do you have a photo with the mattress on top?
Ryan says
Such an awesome idea! I would love to recreate it in our boys room!
Nathanael Soto says
It is beautiful. But Instead of having a light switch, if is going to used for a kid. Install a remote control lamp or a fan. Or a walking sensor for the kids night light.
Alia Naqvi says
I absolutely loved the fact you made it look soo simple and achievable.