
Take an outdated pantry closet and turn it into a beautiful custom pantry.
Creating a functional kitchen space is probably top-notch on everyone's list. And having an easily accessible and organized pantry is a big part of that functionality. An organized kitchen is a happy kitchen around here.
While a walk-in pantry is ideal, it is not always possible due to a small kitchen or limited space. See how you can take an outdated pantry and turn it into a custom kitchen pantry design with this DIY kitchen pantry renovation.
I love a good DIY project and have completed several in this house. This pantry project is my favorite so far in our farmhouse kitchen. We had several issues with our pantry.
- The pantry doors did not match and were different sized panels
- Woodwork and shelves looking worn out
- Doors always left open
- Disorganization of food and supplies
- No easy access

When you have any of these problems with your current pantry, it might be time to overhaul the space with a new pantry. I decided to tear out the doors and the shelves and install upper and base cabinets, along with new counters and a desk space.

How to Complete a DIY Kitchen Pantry Renovation
When our bi-fold doors finally started to break off the track and lose function, I knew it was time to either pay the price for new custom doors or give the entire space a makeover. I opted to renovate this space into a beautiful farmhouse pantry with organized storage space.

DIY Demolition of Old Pantry
Demo is fun, but definitely a messy job!
Clean Out Food and Supplies
Your first step in any kitchen renovation is to clear out what you don't need. Clean out all of your pantry goods and store elsewhere until your pantry makeover is in place.
Remove Doors
Remove the old closet doors and throw them unless you are planning on reusing. With two different sized doors from previous owners, hanging on to repurpose these doors was not an option.

Remove Built-In Pantry Shelves and Trim
Take out all of the wood shelving and trim pieces inside the closet. Don't forget to remove the bifold hardware pieces too.

Take Out Any Walls
Before removing any walls, you will want to make sure it is not a load bearing wall. Have someone come and look at it first to tell you if this is possible to remove without putting in support beams.
Luckily, the wall in the middle of the closet space was not load bearing. When we were given the all clear, I ripped the wall down. Because it wasn't a load bearing wall I ended up taking everything out up to the crown molding.

Designing a New Kitchen Pantry
The original plan for our pantry was to remove everything and then add shelves and sliding barn doors to hide it all. However, after everything was ripped out the open space made that side of the kitchen so bright and warm.
We decided the perfect solution would be to leave it all open. Now we had the task of figuring out how to make it look beautiful and stay on budget.

Making a Plan
You will want to create a plan for your kitchen pantry design ideas. Decide what aspects you really care about and implement them into your plan. After all, a little creativity can bring plenty of counter space and easy access to pantry goods.
I drew up a plan to use as a guide and then got work. Since the far right closet used to be part of the kitchen before the remodel, there was already power and water routed in for the fridge. I thought it was a good idea to put it to use for our specific needs for the space. In the plan I added a mini fridge and ice maker.

Change or Add Electrical
The next task to accomplish was changing some wiring. I hired an electrician to move the power so we could have a few more switches in this area and be able to install some lights over the desk area.
Patching Walls
Make sure to patch any holes or do wall repair after electrical work has been completed. I patched holes and built the ceiling back to where it originally was.
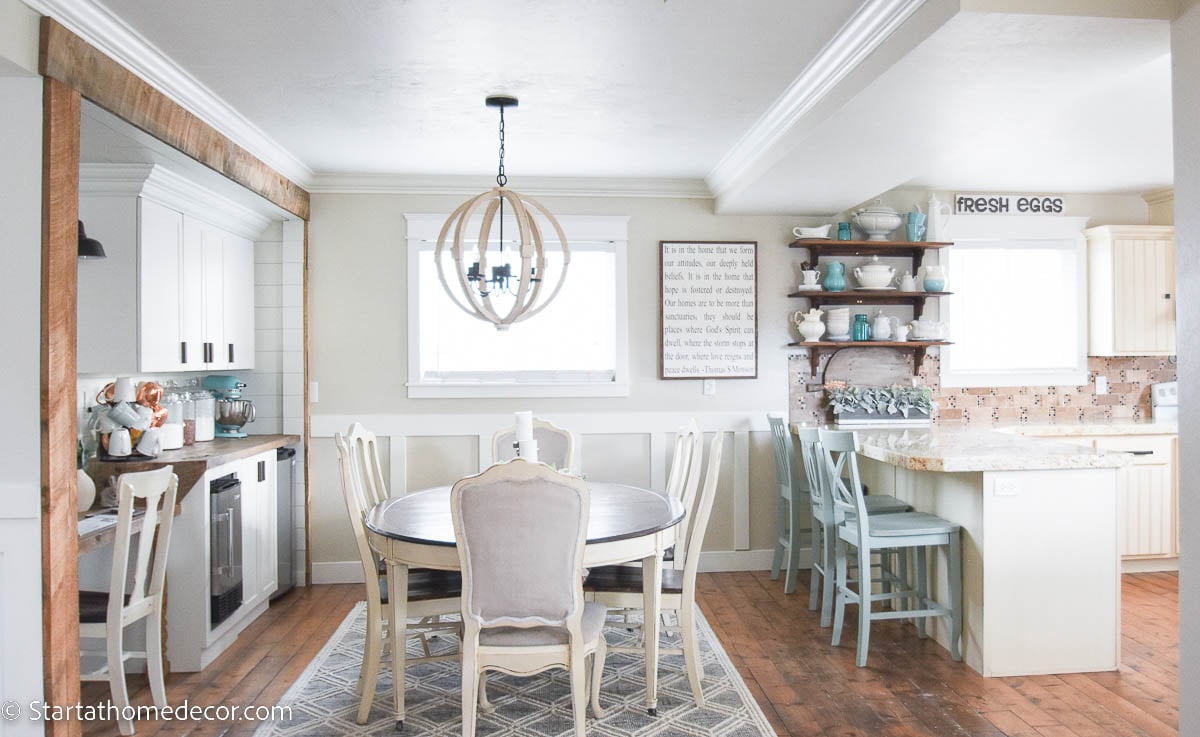
Instead of leaving the wall as typical drywall, I opted to add shiplap to cover all of the walls for a more finished look. It's a great way to add some style surrounding your custom cabinets.

Reclaimed Wood Counters and Door Frame
In our design we opted to use some of the pantry space to add in a cute farmhouse desk. To help keep costs down, I made the desk and countertops from reclaimed pieces of wood. I used that same wood to case around the pantry and create the look of a beam. It ties in very nicely with the wood tones of our pine flooring.
Installing Cabinets and Trim
After adding a desk, it is time to install upper cabinets and base cabinets to the small pantry area. To finish it off I installed crown molding across the front of the cabinet.
Even with the desk and small appliances we still have enough space for food storage. The upper and lower kitchen cabinets along with the countertop provide plenty of storage space and help with pantry organization.
If you are wanting more storage but not a fan of using cabinets, you can also opt for open shelves. We installed open shelves near our kitchen sink and I love having them for displaying dishes.
There you have a complete pantry renovation!

Kitchen Pantry Ideas We Made a Reality
Appliances
The best part of this pantry upgrade is adding in the ice maker for our pebble ice. This has become a staple for our family so it made sense to put one in on the inside of the cabinet area. Since there was a water line already in the space, the installation was fairly simple.
Another favorite item in the pantry is the mini-fridge, which we use to keep a supply of drinks and store any overflow from the kitchen fridge.

Countertop Organization
I love the idea of having some food items on display. These beautiful glass jars made storing some of our basic cooking supplies look visually appealing. And to go along with the drink station zone, I added in my display of mugs for those cold days when you desperately need something warm to sip. We also chose to display my refinished KitchenAid on the counter for easy access.

Desk Area
Putting in a desk area was pretty important for our family. I wanted a place where it could be in a centralized location. It is nice to have it so close to the dining room because you can still do homework and be a part of family conversation. It has made doing homework so much easier, while also allowing us to better monitor computer usage.
Finishing Touch
To fill the wall space above the desk I added a 'thankful' sign. I love how it perfectly completes the entire pantry space. The black sign compliments the black hardware on the cabinet doors.

Farmhouse DIY Kitchen Pantry Reveal
This lovely organized kitchen pantry space turned out beautifully and I couldn't be happier. Adding the shiplap and the weathered wood provides great texture and warmth.

I also added some pops of color and decor, but not too much. As a main gathering place that is frequented often by other people, you don't want this area to look cluttered. The easiest way to keep it uncluttered is by only adding a few necessities and keeping a mostly neutral color palette.

This space reaffirms that a walk-in pantry is not a requirement to have a functional and beautiful kitchen pantry space. This easy DIY kitchen pantry renovation is now the perfect farmhouse kitchen space and meets all of our family needs.
Shop the House here:

Happy DIYing!
Brooke

Andrea says
OMG! This is absolutely AMAZING! What a wonderful job you did. Seriously inspiring me to do this to my home office. What is the countertops made of???? LOVE them!
startadmin says
It is reclaimed pine!
Brittany says
What stain did you use on the wood beam? I love the natural wood and white shiplap!
startadmin says
I didn't do anything to the beams... they are naturally weathered!
Kelly Cousineau says
Absolutely LOVE this pantry makeover! Wow! And you styled everything beautifully!
Malerie Wall says
Where did you get the slip covered chair?
startadmin says
I made it for the chair
Karley Turner says
Where are the lights from? Thanks!
Karley Turner says
Where are the lights from? 🙂