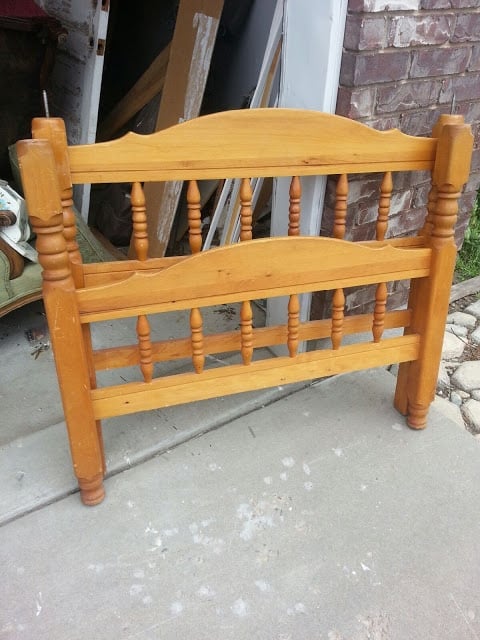
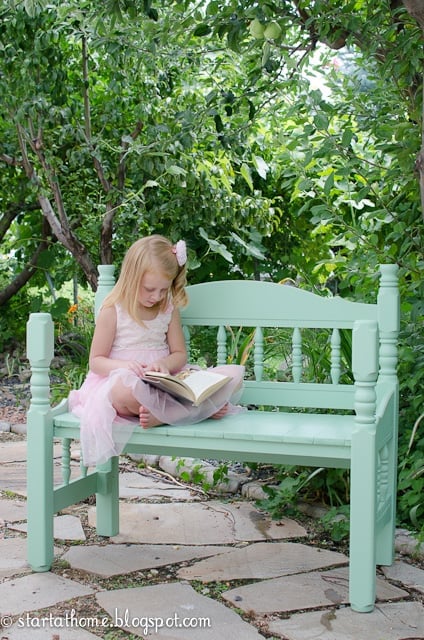
Create the porch of your dreams with a gorgeous DIY bench you can repurpose from an old headboard or footboard.
Since spring is just around the corner, it's time to begin thinking about porch and entryway decor to welcome in the new season. Undoubtedly, the perfect addition to any entryway or porch is an adorable bench.

In the past I have created some amazing furniture transformations. One of my favorite furniture projects is this adorable DIY dresser turned bench. I have also brought new life to an old crib by turning it into a bench. If you enjoyed those DIYs you are sure to love this project as a bench is made out of an old bed frame foot board.
It is unique, and turned out beautiful. Take a look at the full tutorial on turning a bed headboard or footboard into an stylish bench.
Headboard Benches
To get started on this DIY project a couple of things will need to be gathered.
Supplies You Will Need:
- Old footboard or headboard for the back of the bench
- 2" x 4"
- Chop saw or Circular saw
- Jigsaw
- Drill and bits
- Wood filler
- Wood glue
- 2 inch screws
- 2 ½ inch screws
- Old table legs or create your own
- ¾" pine board planks
- Finish nail gun
Watch the tutorial here
DIY Turn a Headboard or Footboard into a Bench
Make Frame for Bench Seat - Step 1
To begin this bench the first thing that needs to be made is a frame for the bench seat. This will attach to the back of the bench. Vintage headboards or footboards both work for this project.
- Firstly, cut down a 2" x 4" into four pieces: two for the sides, one for the front and one for the back. However, measurements will vary according to your length of footboard or headboard you are using. Basically, you will need two long pieces and two shorter pieces. Cut the corners at a 45 degree angle for a nicer finish.
- Following that, use a large drill bit to make countersink holes in the edges of the long 2" x 4"s. This easily allows you to use wood filler for the holes after screws are in.
- Apply glue to the 45 degree angles to help the joints be even stronger. Next, place a side and the front 2" x 4" together, then use two 2" screws in the countersink holes to secure them together. Repeat this on all four corners.
- Once the frame is assembled, cut down a 2" x 4" for added seat support in the center of the bench. Because you'll want to secure it, again pre-drill a countersink hole and use two 2 ½" screws on each side to hold the whole thing in place.

Attach Frame to Footboard - Step 2
- Now the frame can be attached to the footboard. A good bench seat height is 16 inches. In order to achieve the proper seat height, place the top of the 2 x 4 frame at 15 ¼" so when the ¾" pine planks are added for the top it will sit right at 16" high.
- Pre-drill the screw holes with an ⅛" bit. Then use 2 ½" screws to secure the frame to the footboard.
Attach Legs to the Front of the Bench - Step 3
- For the 2 front legs, we used legs from an old table. You can also use scrap wood as long as it is sturdy. Cut legs down to length and then use a big clamp to hold the leg in place while attaching to the bench.
- Use the ⅛" bit to pre-drill holes and then use a large bit to create a countersink hole.
- Use 2" screws to secure the legs to the bench frame.
Create the Seat of the Bench - Step 4
- When the legs are secure it is time to measure the seat boards. We are using ¾" pine planks. Ideally, you want at least a 1" overhang on both of the sides and the front so measure accordingly.
- Because the seat needs to fit snug into the footboard, notch the ends with a jigsaw. Finally, use a finish nail gun to attach the pine planks to the seat of the bench.
- Wait to attach the top until after your boards are stained so you don't get stain on the bench.

Paint and Stain ¥our Bench - Step 5
Lastly, lightly sand your furniture with a high grit sandpaper. Now you can paint and stain your bench according to preference!
To paint this bench I used Sweet Pickins Sweet Jane milk paint and accented with Flour Sack. Then when your paint is dry, seal your bench with Sweet Pickins Dark Oil Wax. You can also stain your seat planks. I used Miniwax Special Walnut stain.

Now this footboard has a new repurposed life! Transform an old bedframe into a beautiful solid wood bench. Indeed, the next time you come across an old headboard or footboard at your favorite thrift store, facebook marketplace or on the side of the road don't hesitate to pick it up! You can make a cute bench like this for your own home.
Other Headboard Bench Ideas
This bed was a MESS and used to be a bunk bed! With years and years worth of paint on the frame, it may not be a great bed options anymore.

But, it sure does make a darling bench with all the layers of paint showing through. I used the headboard for the back of the bench. For the side just cut the footboard in half! Stained tongue and groove pine makes the perfect seat.

Here is a similar style bed, clearly in better shape. Look at all those beautiful details. While it may be an outdated bed. We can easily turn it into an in style bench.

For this one we opted to paint it all the same color for a clean look. Next time you are thinking about throwing out an old bed, turn it into a bench instead.

Last but not least this beautiful yellow bench. The possibilities are endless when converting old bed frames to benches.

How to Style Your Headboard Bench
- Place it on the exterior of your home on a front porch or back patio
- Use it as a garden bench
- Put it in your front entryway
- Use it in a bedroom as a reading bench
I have this bench in my entryway by the front door. It is such a fun piece overall to decorate for different seasons. With spring on its way you can add some fun spring accents. This bench looks adorable indoors but would also look fantastic on the front porch. See more spring front porch ideas here. But you better watch out because the neighbors will want one too!
Enjoy this DIY headboard bench!
Brooke
Oh, and did you know you can turn cribs into benches as well? Check out it out here. Wait one more, how about a dresser bench.
Make sure to follow me on Instagram for more DIY's. If you are looking to create your own Instagram account check out my tips and tricks here


Leave a Reply