
Once the tree is all decorated, now comes the cherry on top. Make a big impact this holiday season with this easy DIY Christmas tree topper!
Decorating a tree this time of year is a must on almost every Christmas to-do list. But what about the top of the tree? Don't give in to traditional angels or a classic star tree topper. Make your tree even better this year with a DIY tree topper, customized to your liking!

And making a big impact for a smaller price tag is always preferred. Going to a craft store is probably on your list this time of year. But chances are, you may have a good selection of favorite things that to already use on the top of your Christmas tree.

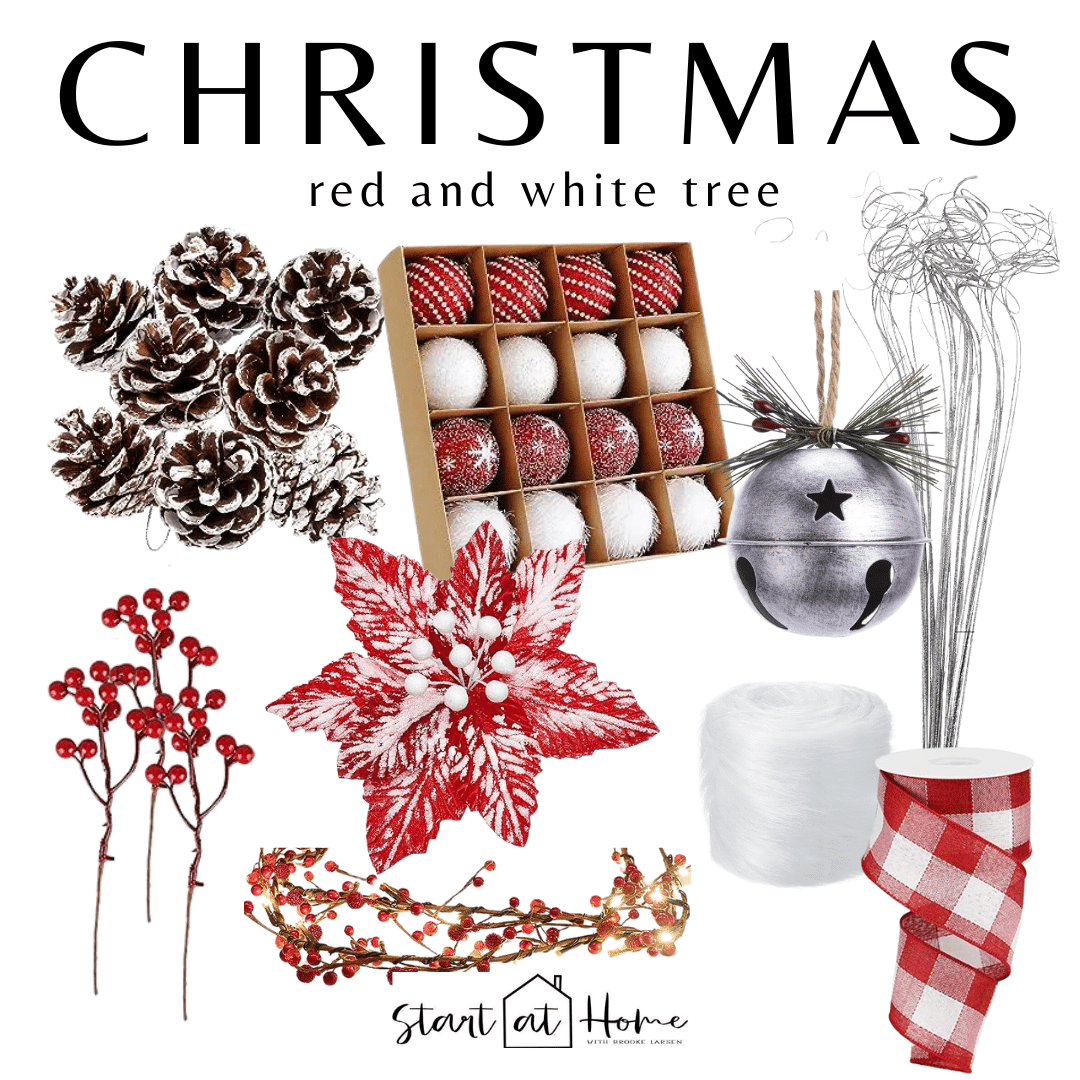
Supplies Needed for the Perfect Topper
The best thing about decorating the top of your tree is that it actually requires very few extra items. And this DIY is all about making it simple. Use what you have to make a unique Christmas tree topper.
- Berries or Branches
- You can view a few of my favorites here.

Step-by-Step Instructions: Christmas Toppers
Step 1 - Decorate Your Tree
First things first, decorate your Christmas tree. Sometimes imagining what my tree will look like and the end result are not always the same. To help with this, here are a few ideas:
- Pick a theme - one year I did Buffalo Plaid
- Choose different colors that go well together - Red and white is timeless
- Pick a style that compliments your own home decor
- Don't be afraid to go big and bold
You definitely want your topper to match so save that for adding last.
Step 2 - Lay Out Your Berries
A little organization can get those creative ideas flowing. Lay out all of your berries and branches in one place. They can be curved branches or straight branches. It helps to know what you have and to get an idea of where you want to place it.
Step 3 - Add Your Berries to the Top
It's a simple idea, but an efficient one. People tend to put on less ornaments as they get to the top of tree. Take the opposite approach! Instead of thinning down the decor, go for a fuller top.
One by one, add your stems to the top of your tree. Stick the branches down into the tree with the berries sticking out the top. Start on one side and work your way around the tree. Mix and match different types of berries as you go.
View my tree here and it is only $40
Need a little visual assistance? You can view how I do this in my full tutorial video below. You can subscribe to my YouTube channel here as well!
Step 4 - Add Optional Embellishments
You can keep your Christmas tree topper simple with berries or branches. But sometimes going one step further can add a little something extra. We have had both styles in our homes and each of them looked gorgeous.

Once you've finished adding in your berries, feel free to add a few more embellishments around the top. That can be anything from classic holiday decor to favorite ornaments. It's up to you get creative!
Here are a few ideas for giving your own tree topper a little something extra!
- pom poms or a felt ball garland
- bows
- ribbon
- pinecones
- DIY Christmas ornaments
- snowflakes
- Christmas bells
- small stars if you love the classic star tree topper
- angels if you love a traditional angel Christmas tree topper
And whether you choose to embellish or not, don't forget to hide the berry or branch stems. You can do this easily with extra ribbon, bows or ornaments.
Christmas Tree Toppers from Previous Years
Classic Red and White

This was a classical red and white theme that turned out lovely. The topper was kept pretty simple and complimented the style.
For other tips on decorating a Christmas tree check out my ribbon tutorial here.

Berries and Snow

This incredible DIY topper incorporated snowy branches, faux green branches, and varying sizes of berries. Faux flowers are also a great option and helped to hide the stems. You can also try making a few DIY ornaments to throw in.
Star Topper

And you can see here that a traditional three-dimensional star topper was added to the berry branches.

Christmas Bells Ringing
Those Christmas bells were a perfect finishing touch to change up my Christmas tree topper. The red really pops against the white branches. It really makes it feel like a white Christmas is possible this Christmas season. Shop my room here

Artificial Christmas trees or not, there you have a simple and inexpensive way to really embellish your Christmas tree this year. Can you just see that creative tree topper on your gorgeous pine looking fabulous in your living room? What a great addition to the wonderful things of this season!

Enjoy making your very own Christmas tree topper to celebrate the holidays!
Happy Decorating!
Brooke


Leave a Reply