
A thrifty option for building a DIY retaining wall that will last.
Building your own retaining wall in your outdoor space is a great way to add interest and structure. Plus, a DIY project like this can do wonders for tackling drainage issues or simply help level out an uneven yard. However, retaining walls can often be expensive. Never fear – there are now plenty of affordable options for achieving a classic black retaining wall look.
This article provides step-by-step guidance on how to build a stunning black retaining wall on a budget. We'll cover your base material selection, budgeting, and simple installation techniques. With careful planning and a few cost-cutting tips, you'll soon be able to create a modern retaining wall design with shou sugi ban that won't break the bank.

Cement Blocks for DIY Retaining Wall
We had to figure out a way to retain our driveway so we could keep our backyard a flat area. I researched several options from railroad ties to concrete walls. The most inexpensive option we found for our needs were these retaining wall blocks that were not very attractive.

After getting tons of bids, these ugly 6'x2' cement retaining blocks were by far the cheapest for this kind of wall. We purchased them from Jack B Parsons Concrete in Salt Lake City, Utah. We then had to pay for them to be transported and placed as well as renting a machine to haul them.
Make sure that you have a level base and a layer of gravel to help with the drainage before laying the first row of blocks. We opted to hire additional help for efficiency. Keep in mind that you can only go about 3 blocks high with these rocks. A taller wall requires using a structural engineer.
Even with all of the concrete blocks and additional wall materials, the total cost was under $5000 for this DIY retaining wall. Such a deal for any kind of lasting wall construction. And now to make a beautiful retaining wall exterior! View more details on our exterior here.

Creating an Alternative Wall Front
After all of the blocks were put into place for our small retaining wall, the next course of action was to add some style to those dreary rock fronts. I really love the look of a modern black retaining wall, so I had to find an alternative method to achieve this beautiful style and hide the ugly concreted slabs. The shou sugi ban method, also known as yakisugi, of burning cedar gave me just that!
Supplies for a Shou Sugi Ban Black DIY Retaining Wall
- 6' cedar boards - I used the fencing boards from Home Depot
- Weather treated 2x4s - Home Depot
- Hammer drill
- Impact drill
- Black deck screws
- Self taping screws
- Propane
- Torch
- Tung oil
- Metal saw horse
- Brush
- Miter saw
- Hose
- Sponge
How to Create Shou Sugi Ban
Torch Both Sides of Wood
First step, prepare your wood for the preferred length and height of the wall. Lay your cedar out on metal saw horses and torch both sides evenly. It can get an alligator texture which I personally like. It is a good idea to have a second person helping with the burning process for safety.
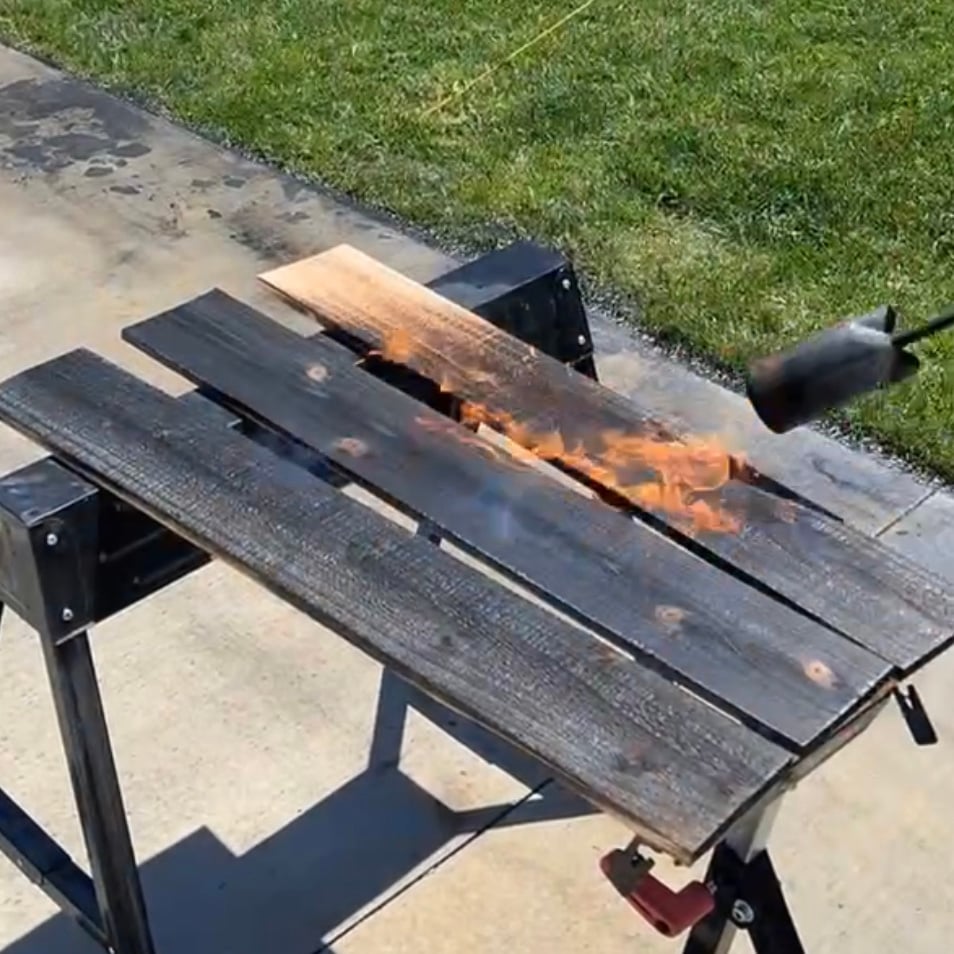
Water Down and Brush
You definitely want the right materials on hand for this project, specifically a garden hose and water. After I torched both sides, the next step is to water down the cedar and use an acrylic bristle brush to wash off the ash.

Pro Tip: heating up cedar can cause it to cup or bow in the middle. This is normal. I found if I torched both sides first before cooling with water, I had less cupping and more of a straight edge.
Drying Time
Prop up your wood slats and allow them to dry.

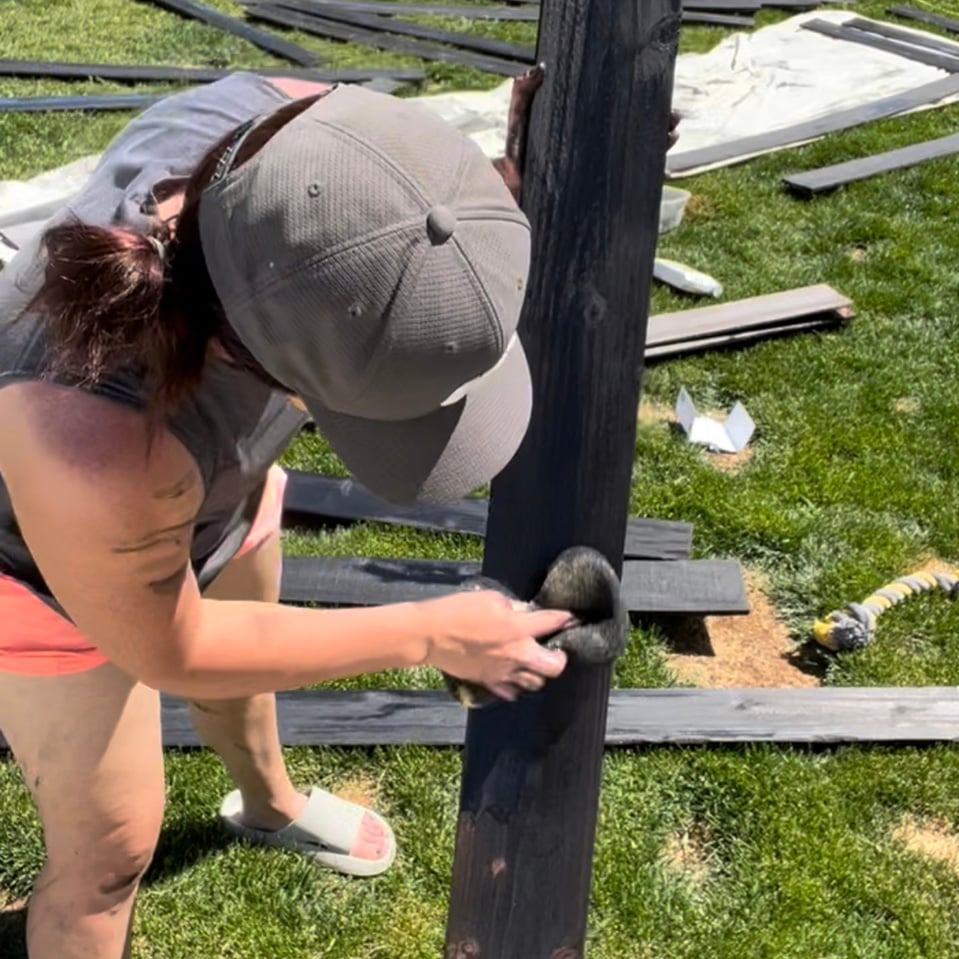
Seal the Wood
Once dry, don't skip this next important step to seal your wood. I used a sponge and 2 coats of Tung oil to seal them.
Build 2x4 Framing for DIY Retaining Wall
Build the Frame
When your shou sugi ban wood is processed, it's time to move on to the retaining wall. Gather your building materials and 2x4s. We found it easiest to build the frame on a level foundation first and then stand it up. This may or may not work depending on the size of your wall, but it worked for our wall's height.

Attach the Frame
To attach the frame to the base of the wall we used a hammer drill to drill the holes for the screws. Then we used self tapping screws and a drill to drill the frame to the cement. You want to make sure you start off with a solid base.


Add Shou Sugi Ban
Now that our frame is attached we can add the shou sugi ban cedar easily to the frame with black deck screws. I started at the top and worked my way down to ground level with subsequent rows.

Shou Sugi Ban DIY Retaining Wall Reveal
This shou sugi ban black retaining wall turned out even better than I thought I would. Now the front of the wall has a beautiful aesthetic appeal!

Looking for inexpensive retaining wall ideas that won't cost your entire life savings? This DIY retaining wall with cement blocks and a beautiful black cedar covering is a perfect option for the DIY enthusiast. The cedar retaining wall is also a great option for smaller landscaping projects or flower boxes too! Check out the video for a fun way to use it.
And don't forget to finish off the rest of your outdoor space with 6 easy outdoor ideas or with a beautiful backyard deck design.

Happy DIYing!
Brooke


Leave a Reply