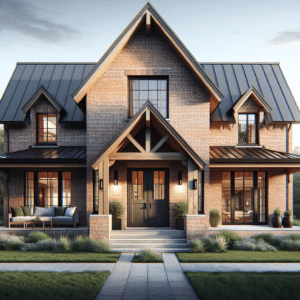
Our exterior isn't quite done, but I have been getting a lot of questions about it. I will link everything I can in this post and update it as things get finished. I am just as eager to share all the details on our exterior so you can learn right along too.

Exterior: Hardie Board
Our home was first wrapped with a vapor barrier and then we covered it all up with Hardie board.
Hardie Board is made of cement fibers to create a very durable exterior covering. It is fire resistant as well as mold and mildew resistant. It is great at withstanding harsh weather as well as termites. The draw back with hardie board is the cost. It is a little more expensive than vinyl siding and it doesn't have to be repainted every 20 to 30 years. It's worth it to me to pay extra for the additional protection and ease of maintenance.
My entire house is wrapped in Hardie board. But to change things up a little bit I used different types. The main part and back is Hardie siding. The eves in the front are shakes and the window pop-outs are board and batten. Since I knew I was going to be painting the whole house white I wanted to add some texture with different types of Hardie board.

Exterior: Painting and Stain
Once the Hardie board was up the painting process began. Before painting the Hardie board, nail holes must be filled and seams need to be caulked. This ensures that your Hardie board will look ideal. I painted my home in Oyster White by Sherwin Williams in a satin finish.
My front doors are cased with red oak, but the actual doors are fiber glass. To get them to match was quite the task. I used Minwax's Vintage Oak Gel stain on the red oak frame. To get the doors to match I did 3 coats of Vintage oak gel stain and then 2 coats of mahogany to add a hit of red. It wasn't easy, but it was worth the hard work.

Exterior: Windows
My Windows are from Amsco. They are the studio line They are black on the outside and white on the inside. I wanted to create a cottage atmosphere in my home and my windows were the perfect element to do that. My windows are mulled together. Instead of my windows being single windows with framing in-between them they are mulled together at the factory and then installed as one big window. I did grids on the top to add to that cottage feeling.

Exterior: Brick and Roof
My brick is called English Tudor. Instead of doing grey grout I went with a white grout. I love how it looks. My roof is black as well as the soffit and fascia.

Here is how our exterior turned out!

Decking

Our framer built the main part of the deck for us. We extended the deck ourselves to include a catwalk to the back door. Before we put on our decking we ran window flashing tar paper along the joists to help protect the wood


We are doing our deck in Trex in pebble grey. Our railing will be black railing from Cinch ..... we will find out if it is cinch here soon.
Here is how it looks completed!


Now for our retaining wall! We used 6’x3’ blocks to retain the side of our drive way and the back of our property. This was such an easy affordable way to retain. We spent roughly $5000 to retain our whole yard!


Here is how the wall looks for now! We hope to finish our backyard in the spring!
More details to come on our home exterior. Thanks for joining us and learning along in this home-building journey!

Leave a Reply