Adding a Faux Fireplace is a Budget-Friendly Way to Create a Beautiful Focal Point in the Home.
A fireplace can create a unique focal point in any home. Fireplaces come in all different shapes, sizes and styles. You can also choose what heating element you prefer. A gas insert, wood fireplace, or an electric fireplace insert. Many recent builds already have traditional fireplaces installed.
Unfortunately, our home did not have a fireplace at all. Since fireplaces create a great feature wall and a cozy appearance that entices people to gather, I desperately wanted to have one in the family room of our home. When installing a real fireplace isn't in the budget, build a DIY faux fireplace that will look just as good!

A wood mantel and a surround with tile are the main elements for this beautiful DIY faux fireplace. To create a cozy fireplace that is more lifelike, I filled the back of the fireplace with logs. Wood projects like this and other DIY projects are an ideal option for creating a stylish look you will love in your home.
Many traditional family rooms without a fireplace tend to use large bookshelves or entertainment centers to make up for the lack of design element. Add in stylish features with a new faux fireplace.

DIY Projects
Vintage markets are awesome places to find random treasures. On one of these vintage market outings I found a beautiful, vintage fireplace wood mantel. This faux fireplace mantel was the perfect replacement for our huge, black entertainment center.
However, when you don't have a fireplace on your wall already, you have to get creative with a decorative element. Making a faux fireplace is a fun DIY project to allow style customizing and creativity.
Supplies You'll Need For Your Own Fireplace Project:
- Base molding
- Nail gun and nails
- Piece of plywood
- Measuring tape
- ¼" thick cement board to lay tile down
- Tile
- Tile saw
- Thin set
- Grout
- Tile Trowel
- Baseboard
- Wet tile sponge
- Trim molding piece, if desired
How to Create a Cozy Faux Fireplace
This project is ideal for any room where you want to create a cozy atmosphere as long as you have open wall space or a large enough nook. Consider different options like a living room, master bedroom or even a dining room.
Build the Faux Fireplace Base
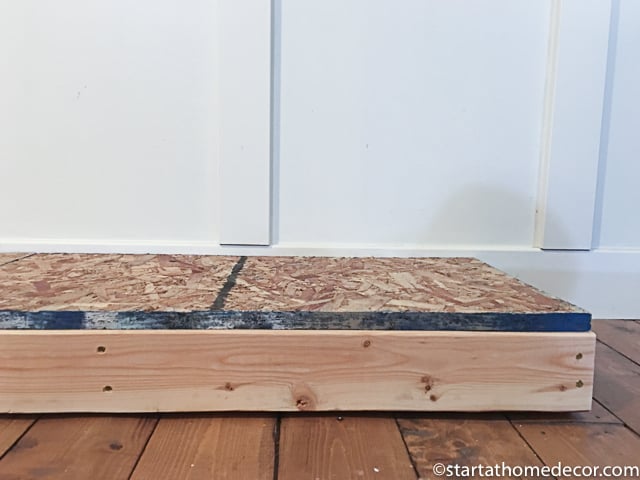
First, build your base out of 2x4s. I formulated my length based on the length of the mantel I purchased. These measurements will obviously vary depending on the space in your home.

Secure Base to Wall
When your base is built, nail it to the wall so it is secure. A sturdy foundation is very important.

Add Plywood
Add a layer of plywood to the top of your base. I wanted it to be sturdy because I knew my kids would probably stand on it at some point.

Add Cement Board
After adding plywood, then you will screw in ¼" thick cement board on top. This is what you will lay the tile on.

Lay Tile
Installing tile adds a little bit of extra cost, but the final look is worth it. Tile adds a lovely polished appearance that makes everything seem a bit more finished.
To do this step, begin by laying out the tile pieces. Working with tile that is uniquely shaped like hexagon can be hard to get pieces exactly right. A great way to make sure the cuts and spacing are correct is to lay everything out first.

Apply Thin Set and Place Tile
After laying out all of the tile you will apply your thin set. Don't apply all of your thin set at once because you don't want it to dry out. Start on one side by applying thin set, then placing the tile on top of it. Keep doing this in sections and work your way across to the other side.


Allow Drying Time
Here is what it looks like when all the tile has been placed. After the tile has been laid, allow the thin set to dry for 24 hours before grouting.
Baseboard and Grout
Next, add the white baseboard to in front of the 2x4. This will help to hide the 2x4s and other layers. Do this before grouting so you can fill the gap along the outside edge with grout as well.


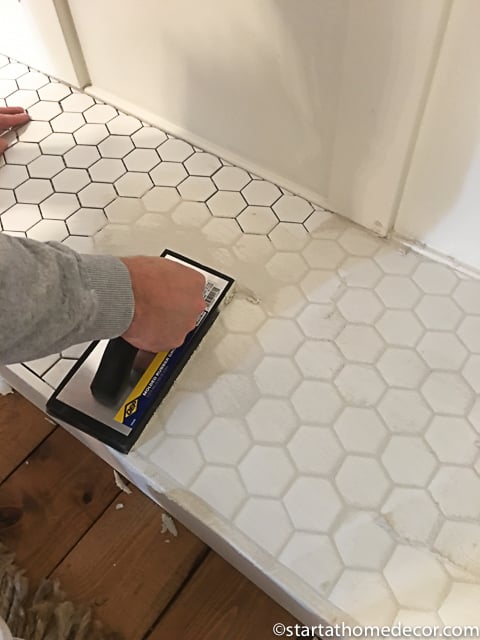
I used premixed grout and a float tool to get it down in between the tile.
PRO TIP: After grouting a small area, use a wet tile sponge and remove all the excess grout.
You don't want any grout left on the top of your tile. Once it dries it is VERY hard to get off and could potentially ruin the top if you have to scrape it off.

Let your grout sit and dry for 24 hours before placing the mantel on top of the tile.
Adding the Mantel
When your grout is dry, place your mantel on top of the base and secure it to the wall.

Add Tile to Mantel
I wanted this fake fireplace to look as real as possible. To do that I also wanted tile to go around the inside of the mantel. I attached pieces of 1x8 pine boards to the back frame of the mantel for a flat surface to add tile.

Next, I added the hexagon tiles using the same process as the base. My cuts are not perfectly exact because I am adding a border along the edge. However, you still want to make your cuts as straight as possible.

Add Trim
To give the edges a finished look, you can add a narrow piece of trim or molding around the outside edge of the tile border.
Finishing Touch
After installing the tile and mantel, this faux fireplace needed an additional touch of authenticity. What would look more authentic than using real wood for our fireplace logs?
Find tree branches that you can use to cut up. Use a saw to cut the branches into smaller wood logs. You can treat the wood if desired, or leave them as is. Stack them tightly until they almost fill the entire fireplace. And there you have it - an easy DIY faux fireplace.
There are many different ways to fill a faux fireplace. Here are a few options to consider.
- Flameless candles
- Faux logs
- Faux brick
- Wallpaper
- Artificial flowers or branches
- Fireplace screen
- Art decor
You can decide how to decorate your own DIY faux fireplace based on the theme in your living room.

Great Place to Gather
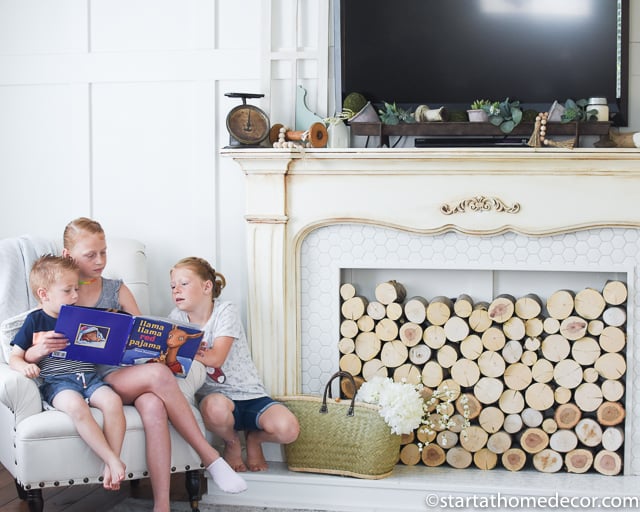
This thrifty faux fireplace project is complete! The family room now has a beautiful focal point and it adds so much character and warmth to the rest of the room. We saved lots of money by not installing a real fireplace.
Using the beautiful mantel I picked up from the vintage market definitely made a stunning and cozy addition to our home. It's the perfect cozy look and gathering space for our family.

Another great bonus about this space is that even my kids enjoy reading by the side of the fireplace.

Looking for more ways to change up your family room? Find inspiration looking at these stunning family rooms or learn how to incorporate decor around a TV.
Happy DIYing!
Brooke


Leave a Reply