Get beautiful refinishing results using milk paint on metal projects.
If you’ve ever dreamed of owning a decorative and one-of-a-kind item, then run to check out these milk paint finish metal ammo boxes. These eye-catching containers are made from recycled military ammunition boxes and given a new life with an authentic look. For beginner crafters to professional creatives, everyone loves the idea of transforming rusty metal into a gorgeous piece of furniture.
In this article, we’ll explore the history and process of milk painting, highlight the key features of these eye-catching ammo boxes, and consider the many practical and decorative uses that these vintage furniture pieces can have in your home or office. Let’s get started!

Milk Paint Project
Milk paint is a favorite medium to use.
- It is incredibly easy to prepare because it comes in powder form
- You can easily mix as you go
- A small amount goes far
- Easy to create a distressed or chippy look using milk paint
- Sticks to wood surfaces and non-porous surfaces like metal
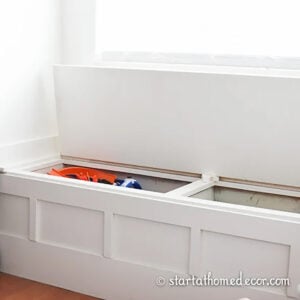
I found these unattractive ammo boxes at a war surplus store and I really had no idea what to do with them. But I liked them too much to leave them behind, so home they came and in the garage they sat until I decided what to do. These are no longer sitting in my garage and instead I have a beautiful milk painted metal ammo box.

The entire piece looks awesome painted with this milk paint mixture. I used Sweet Pickins milk paint in the Sweetie Jane paint color.
Supplies You'll Need
- Rag
- Scrubber or wire brush, if needed
- Dish soap
- Milk paint powder
- Water
- Bowl
- Whisk
- Paint brush
- 220 grit sandpaper
How to Use Milk Paint on Metal
Milk Painting Prep
Did you know you can paint with milk paint straight onto old metal? Just make sure your metal surface is prepared first. To do that, you need to make sure that all dirt and grease are removed. Dish soap is the best option for this. Use a rag and a little bit of soap on the top to scrub the metal surface until everything comes off.

Then, wipe it down again with a clean wet rag and your metal ammo box is ready to go!

Apply Milk Paint on Metal
A true milk paint is not like regular paint because it contains a milk protein. It is a pre-mixed milk paint that comes in a powdered form and has to be combined with water. Why, you ask? Since it is milk based it will spoil within a day or so. If you need to keep it a bit longer you can place it in the fridge.
When you mix up the paint, use just a little bit for the first time so it doesn't go bad. You can mix more later if needed. For best results with this project, I used equal parts water to equal parts of powder. Start with ½ cup water to ½ cup milk paint.

First step, measure out your desired powder and water. Once everything is measured out, dump the powder into your water.

The next step is to begin mixing. Mix the milk paint for two minutes until there are no clumps. It needs to be a bit more thick to have the milk paint stick to the surface. It may be easier to use a whisk.

After mixing, it is time to paint your first coat. There is no need to prime or sand old metal, so you can just start painting. Make sure you use a high-quality brush and that you are applying paint with long strokes to get the desired coverage needed.
When your project is painted, let it dry. As the milk paint dries it will begin to flake in random spots. That is a normal step in the process.

Light Sanding
After the first coat is dry, use a 220 grit sandpaper for light sanding to get all the flaking paint off and make sure everything is smooth. Once the milk paint surface is smooth you can apply a second coat of paint. I only used two coats to cover this metal box, but if you want a darker or more prominent paint color, you can apply more than two coats.
Again, milk paint has a short shelf life so either put any unused paint in the fridge or discard it completely when you finish. And since milk paint naturally flakes and has a chippy look, you can leave the final coat as is, or use your sandpaper to lightly distress it further.

Design Ideas for Milk Paint Metal Box
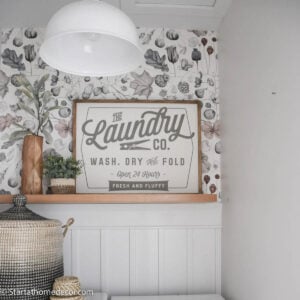
A milk painted metal ammo box has the perfect amount of chippy goodness and a subtle matte finish. This ammo box is the perfect fit under my entryway table because it blends so well with my other decor.
An old ammo box is also a great option for placing at the end of a bed, putting in a library or office or even using it in place of a coffee table in a living room. I love using this in high-use areas because it always receives a lot of compliments for its unique design style! Painting an ammo box gives the metal a different look and softens the harsh texture for creating a cozy space.

Turning an old, rusty metal ammo box into a thing of beauty is possible with a little bit of paint and lots of creativity. Milk paint is a great option to breathe new life into a metal ammo box, giving it a unique and rustic finish. With its beautiful color variations and long lasting protection, milk paint is the perfect choice to transform any rusty ammo box into a stunning piece of art.
Milk paint is a relatively simple and cost effective way to make something old and forgotten into something worth admiring. With such an easy process of transformation, why wait? Revive your metal ammo box and create something that you can remember for years to come, and leave an impression that will last forever.
Happy Decorating!
Brooke

Irene says
This is so inspiring! I love the post:)
irenethayer.com
Rochelle says
Your directions state "For this project I used 1/2 cup water and 1/2 cup water", I assume you mean 1/2 cup powder?
Kelly says
In the mixing instructions, did you mean to say 1/2 c water and 1/2 C paint powder? It says 1/2 C water and 1/2 C water. Thanks!
Bruce says
This is great. Thanks for giving me an idea. I will surely try this.