• Skip to primary navigation
  • Skip to main content
  • Skip to primary sidebar
Start at Home Decor logo
  • New? Start here
  • Home
  • Projects
    • Building
    • Before and After
    • Decorating
    • DIY
    • Furniture
    • Holiday Decorating & Crafts
    • Tutorials
    • About Me
  • Custom Built Home
  • Remodeled Home
  • Privacy Policy
  • Contact
  • Newsletter
menu icon
go to homepage
search icon
Homepage link
  • DIY and Home Decor
  • New? Start Here
  • Our Home
  • Remodeled Home
  • Newsletter
  • Contact
  • About Brooke Larsen
  • Privacy Policy
×

Home

Bathroom Reno Week 2: Getting Ready for Tile

Apr 18, 2018 · Modified: Oct 5, 2022 by Brooke Larsen · This post may contain affiliate links · 1 Comment

  • Facebook
  • Twitter

Of all the tips I can share about bathroom renovation, making sure you begin with a good foundation is key. You might think that you can just lay tile or whatever flooring you choose, right on top of the subfloor. Not so, my friends! If you want something that will last and be good quality, take the time to do it right and give yourself a good foundation. This week my bathroom reno has been all about getting ready for tile.

Table of Contents

  • Bathroom Demolition
  • Getting Ready for Tile: Foundation

Bathroom Demolition

Unfortunately, this is kind of a boring, ugly week in the bathroom... ha ha. I can't wait to give this guy a facelift with our gorgeous products sponsored by Jeffrey Court.
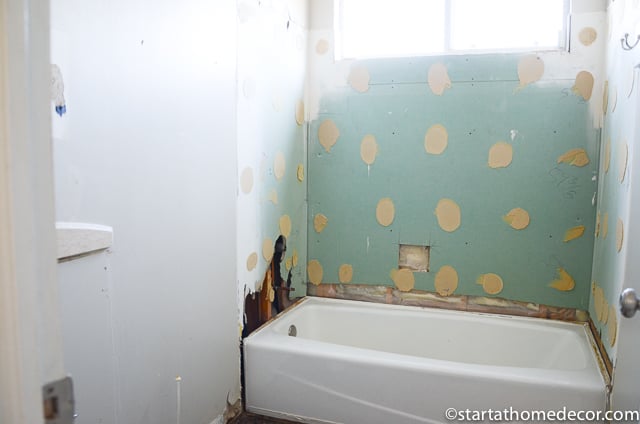
Getting ready for tile

Here is what the bathroom looked like last week. Yes, that is water damage and possibly mold. I have yet to pull apart a bathroom that doesn't have some sort of water damage. If you find this in your bathroom, don't be too alarmed. First, you need to check a few things... is the area still wet? If it is still wet then water is still leaking from somewhere. You need to find the leak and stop it. If it isn't wet, then the next test is how strong is the plywood? If it is at all squishy I would replace it. But, if it is still hard like ours was, then spray it with bleach and let it dry all the way out for a few days. Once it is dry you can finish installation.

Bathroom Renovation

Getting Ready for Tile: Foundation

We removed the old sheet rock because it had liquid nails still attached to it. When you are installing tile, it is important you have a flat and level surface or installation can get tricky. So to be safe, we installed new mold and mildew resistant sheetrock on the walls.

Getting ready for tile-foundation

On the floor we installed ¼" thick cement backboard. Cement backboard creates a very smooth surface and great stability for tile. You will want your floor as level as possible to make it easier for tile installation. Also, don't forget to cut out areas for your plumbing.

Getting ready for tile-flooring Getting ready for tile

I'm excited to begin installation shortly. Don't forget to follow along with our project and learn how you can also get this look in your own bathroom renovation!

Brooke


You might also like...

Our bathroom demolition video here or how to install peel and stick tiles in the bathroom.

Peel and Stick Tiles in Our Bathroom

Join the newsletter

Subscribe to get our latest content by email.

Thank you so much for joining our community, we are so excited to have you! Just one last step, head over to your email and confirm your subscirption!

There was an error submitting your subscription. Please try again.

Powered by ConvertKit
« Demo in the Bathroom
My Favorite Farmhouse Vanity Lights »
  • Facebook
  • Twitter

About Brooke Larsen

Hello Friends! I love anything DIY and home decorator! On my blog I hope you will find home inspo. Whether it is for your next DIY project or home decor. If I can do it, anyone can!

Reader Interactions

Comments

  1. Mani says

    April 30, 2018 at 9:24 am

    Thanks for sharing the post very helpful. Really need this kind of help for my bathroom.

    Reply

Leave a Reply Cancel reply

Your email address will not be published. Required fields are marked *

Recipe Rating


This site uses Akismet to reduce spam. Learn how your comment data is processed.

Primary Sidebar

Hi I am Brooke I am an avid DIY-er and home decorator! I share home inspo and all of my DIY projects with step-by-step directions. I sprinkle in a few recipes to help out all of us busy moms too. If I can do it, so can you!

More about me →

Popular

  • Red Onion Vinaigrette and a Strawberry Salad
  • DIY Aluminum Pergola
    Easy Outdoor DIY Aluminum Pergola Kit for the Backyard
  • Free Spring Printables
    Free Spring and Flower Printables for Kids and Adults
  • DIY Bedside Table
    How to Build a Modern DIY Nightstand with Storage
  • New? Start here
  • Home
  • Projects
  • Custom Built Home
  • Remodeled Home
  • Privacy Policy
  • Contact
  • Newsletter

Copyright © 2023 Start at Home Decor on the Seasoned Pro Theme

0 shares