Scratches on stainless steel appliances can be frustrating, but they don't have to be permanent! Here are some tips and tricks to help restore your appliances!
Stainless steel appliances add a modern, sleek look to any kitchen. However, they are also prone to fingerprints, smudges, and scratches. The good news? With the right techniques, you can restore the shine of your stainless steel surfaces and keep them looking spotless. Let's cover how to remove scratches and how to clean stainless steel using soap, water, and a microfiber cloth.

Removing Scratches from Stainless Steel Appliances
Light Scratches
If you notice minor scratches on your appliance, you can often buff them out with simple household items.
- Baking Soda Paste:
- Mix baking soda with water to form a paste.
- Apply it to the scratch using a soft microfiber cloth.
- Rub gently in the direction of the stainless steel grain.
- Wipe clean with a damp cloth and dry with another microfiber cloth.
- White Vinegar & Olive Oil:
- First, clean the surface with white vinegar.
- Apply a small amount of olive oil to a microfiber cloth.
- Buff the scratched area gently along the grain until it becomes less visible.
- Stainless Steel Polish:
- Use a specialized stainless steel polish (such as Bar Keepers Friend).
- Apply it with a microfiber cloth and rub along the grain.
- Wipe away excess product with a damp cloth.
Deeper Scratches
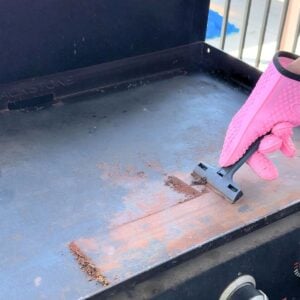
Unfortunately for me, my stove had some very deep scratches that required something a little more abrasive. For more noticeable scratches, you may need to use a slightly more intensive approach. I found a stainless steel refinishing kit on Amazon and it did better than I expected.

Stainless Steel Refinishing Kit
Scratch-B-Gone is a manufacturer-endorsed restoration kit designed to remove blemishes, stains, scratches, heat marks, and rust from uncoated brushed or satin stainless steel surfaces.
Ideal for appliances, grills, and other fixtures, this kit is not suitable for mirror-finish or blackened stainless steel. Each kit is capable of restoring approximately 20-25 scratches, effectively reviving the appearance of stainless steel surfaces by blending repairs seamlessly with the existing finish. Whether dealing with minor abrasions or deeper imperfections, Scratch-B-Gone offers a reliable solution for maintaining the look and durability without the need for professional refinishing.
Since my scratches were deep, I started with the roughest sandpaper. Making sure to follow the grain, I moved back and forth until the scratches disappeared.

At this stage, it might look worse before it gets better—don’t worry, that’s part of the process!

Next, I used a less abrasive sandpaper to smooth the surface. Be sure to apply the polish included in the kit to enhance the finish.

For the final step, I used steel wool to further refine and blend the stainless steel.
The results turned out even better than I expected!

Cleaning Stainless Steel with Soap, Water, and a Microfiber Cloth
Regular cleaning helps maintain the beauty of appliances and prevents buildup of grime and smudges.

Step-by-Step Cleaning Process
- Prepare a Soapy Solution
- Mix warm water with a few drops of mild dish soap in a bowl.
- Dampen a Microfiber Cloth
- Soak a microfiber cloth in the soapy water and wring it out.
- Wipe Along the Grain
- Gently wipe the appliance, always moving in the direction of the stainless steel grain to avoid streaks.
- Rinse with Clean Water
- Use another microfiber cloth dampened with plain water to remove soap residue.
- Dry Immediately
- Use a dry microfiber cloth to prevent water spots from forming.
- Polish for Extra Shine (Optional)
- Add a few drops of mineral oil or olive oil to a clean microfiber cloth and buff the surface in the direction of the grain for a polished look.

Bonus Tip
- Avoid using abrasive cleaners, steel wool, or chlorine-based cleaners, as they can damage the stainless steel surface.
By following these steps, you can keep your appliances looking as good as new for years to come. Regular cleaning and proper scratch removal techniques will ensure they remain a stunning feature in your kitchen!
Got any favorite cleaning tips? Share them in the comments below!
Brooke


Leave a Reply