• Skip to primary navigation
  • Skip to main content
  • Skip to primary sidebar
Start at Home Decor logo
  • New? Start here
  • Home
  • Projects
    • Building
    • Before and After
    • Decorating
    • DIY
    • Furniture
    • Holiday Decorating & Crafts
    • Tutorials
    • About Me
  • Custom Built Home
  • Remodeled Home
  • Privacy Policy
  • Contact
  • Newsletter
menu icon
go to homepage
search icon
Homepage link
  • DIY and Home Decor
  • New? Start Here
  • Our Home
  • Remodeled Home
  • Newsletter
  • Contact
  • About Brooke Larsen
  • Privacy Policy
×

Home

How To Create a Tiered Tray for Any Holiday

Apr 8, 2019 · Modified: Jun 19, 2022 by Brooke Larsen · This post may contain affiliate links · Leave a Comment

  • Facebook
  • Twitter

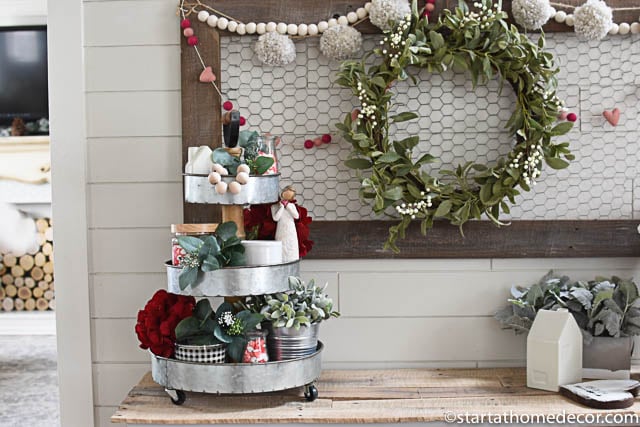
Don't love to decorate for every holiday? I have a simple solution just for you! How about changing out a tiered tray instead?  It is super easy, so simple, and takes very little time. And let's face it, sometimes it is ALL about the simplicity when you have no time, a business to run, and a family to take care of! But I love decorating for holidays... so here we go!  You only need a tray and some filler items to complete this look.

How to Create a Tiered Tray

  1. Tiered Tray
  2. Real touch tulips
  3. Succulents 
  4. Lavender Plant
  5. Terra Cotta Pot Candle
  6. Eucalyptus
  7. Moss Balls
  8. Small Sign

Tiered Tray Favorites

How to Create a Tiered Tray for Holiday Decorating

1- Pick up a stacked tray if you don't already have one. Shop my favorites here! Ps. Not only can these be used for home decor, but you can also utilize these for serving food dishes and parties and such. A great multi-use item!

Create a stacked tray for your holiday decor

2- Add candles. Candles are a great filler item. (View some here) Place them on the different levels of your tray. If your candles sit too low you can stack them on top of something.  (fun state candles here too)

Create a stacked tray for your holiday decor

3- Add flowers. Flowers are a MUST on stacked trays since they create added texture and can bring in lots of color. You can also use artificial or real and achieve the same look. Again, these are great fillers!  (favorite florals here)

Use flowers in your stacked tray decor

4- Fill glass jars with candy. I found these heart candies at the dollar store last year... yup, they stay good for awhile! Dollar stores will also usually have containers or jars you can grab for super cheap. I find that it is always worth it to at least check there first because you can find some major steals. (some other fun glass jars here)

Add colorful fillers for your stacked tray decor

5- Add figurines and other items. I added the Willow tree "I love you" doll, a house vase from the Hearth and Hand collection and a strand of wood beads. Layering items like these figurines and other pieces of different heights will create more dimension for the viewer.

Learn how to fill a stacked tray

6- Fill in with greenery. Added greenery will fill in the empty space and give a more complete look to your stacked tray. Also fill free to use greenery of different shades. Consequently, you'll get more variety if you can incorporate other green hues and textures. (view my favorite greenery here)

Learn how to fill a stacked tray

7- Add our XOXO cutout painted in tickled pink milk paint. Also, having a main focal piece completes the look.

Get my handwritten xoxo cutout here

So, there you have a fun easy tray! Shop my affiliate links here

View our YouTube video and make sure to subscribe!

To change things up a little I also added this heart with our anniversary date from Simply Inspired!

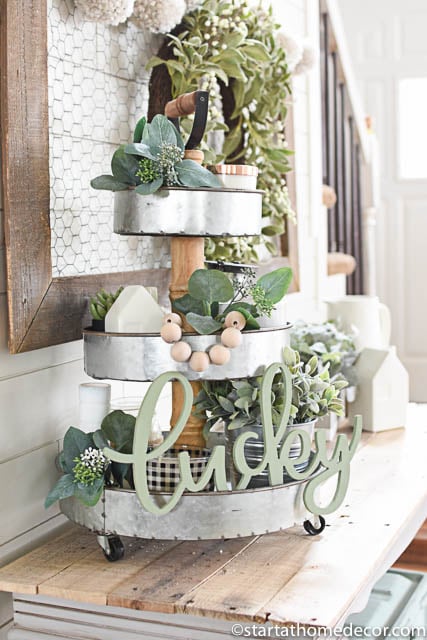
Also, for St. Patrick's Day I removed all the red and pink out and added a little more greenery and our lucky cutout!

Create a stacked tray for holiday decor St Patrick's Day Lucky cutout - stacked tray

Brooke


SaveSave

SaveSave

Join the newsletter

Subscribe to get our latest content by email.

Thank you so much for joining our community, we are so excited to have you! Just one last step, head over to your email and confirm your subscirption!

There was an error submitting your subscription. Please try again.

Powered by ConvertKit
« A Guide to Front Doors
DIY Felt Garlands for Spring on a Budget »
  • Facebook
  • Twitter

About Brooke Larsen

Hello Friends! I love anything DIY and home decorator! On my blog I hope you will find home inspo. Whether it is for your next DIY project or home decor. If I can do it, anyone can!

Reader Interactions

Leave a Reply Cancel reply

Your email address will not be published. Required fields are marked *

Recipe Rating


This site uses Akismet to reduce spam. Learn how your comment data is processed.

Primary Sidebar

Hi I am Brooke I am an avid DIY-er and home decorator! I share home inspo and all of my DIY projects with step-by-step directions. I sprinkle in a few recipes to help out all of us busy moms too. If I can do it, so can you!

More about me →

Popular

  • DIY Sponge wall painting
    How to Easily Paint a DIY Sponge Wall
  • Home Staging Tips
    25 Best Tips for DIY Home Staging on a Budget
  • Back porch ideas
    DIY Back Porch Ideas for Beautiful Outdoor Space
  • How to Easily Create a Farmhouse Bedroom You'll Love
  • New? Start here
  • Home
  • Projects
  • Custom Built Home
  • Remodeled Home
  • Privacy Policy
  • Contact
  • Newsletter

Copyright © 2023 Start at Home Decor on the Seasoned Pro Theme

914 shares