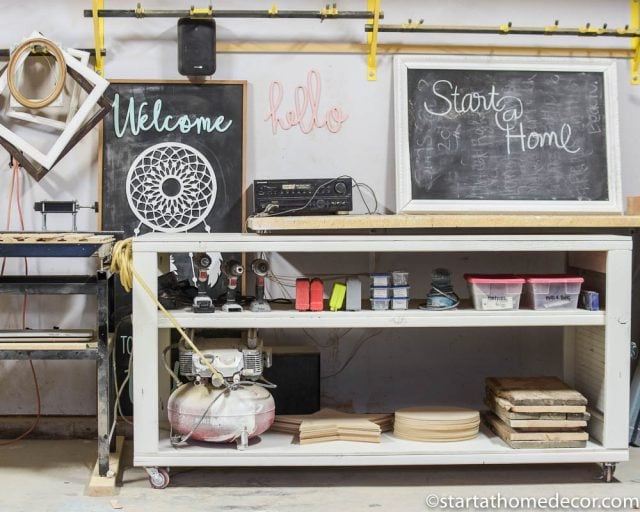
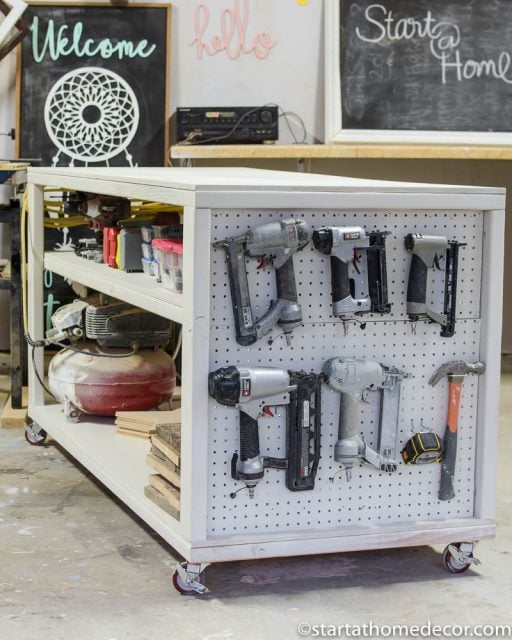
Make a sturdy workbench to provide storage for all of your power tools and woodworking projects.
For all of you busy DIYers, rejoice! Do you feel your workspace is always in disarray? Are you frustrated with having to constantly move stuff around for lack of storage space? Look no further than these detailed instructions for building your own workbench, complete with a video that makes it easy to follow along.
You'll be able to create a tailored work space to keep all your tools organized and within arm's reach. And with just a few tools that you most likely already own, you can create this easy DIY garage workbench in a weekend. So, grab your drill and get ready to get organized!

DIY Homemade Workbench
When you have multiple projects going on, sometimes you need a little help in the organization department. Luckily, my stepdad Dave was willing to work with me on building a mobile workbench for my work area. Today I want to share these step-by-step instructions with you from start to finish!
This video is helpful to get a visual of our project. Follow along for detailed DIY garage workbench plans.
You can view my YouTube Channel here
Supply List and Tools You Will Need
Gather tools from this list before getting started on your new workbench.
- Chop saw or circular saw
- 8- 2x4s
- Kreg tool
- Kreg clamp
- Wood glue (I use Titebond)
- 3' C-clamp
- 2" Kreg screws
- 3 - ½" MDF board
- Nails
- Nail gun
- 2 ½" screws
- Pegboard storage, optional
- Socket wrench
- 4- 3" Caster wheels and screws, optional
- 16 - Lag Screws
- Sander
- Primer, paint, and water-based polyurethane, optional
How to Create a DIY Work Bench
Measure and Cut Your 2x4s
The first step for garage workbenches is to use either a chop saw or circular saw to cut your 2x4s. U a square to mark the 45 degree angle and then cut along the diagonal edge. I prefer to use a chop saw so we used that on the rest of the 2x4s.
For this work bench we cut 6-2x4s to 60 inches long with a 45 degree angle on each end. Next, cut 4-2x4s to 30 inches long and 2-2x4s to 27 inches long again with 45 degree angles on each end.
Create Your Top and Bottom Frames
Use your kreg tool to make two pocket holes on each end of the six shorter 2x4s. Once all of the pocket holes are drilled, you can begin making the top and bottom frames. Assemble these frames into a large rectangle for each top and bottom frame. We used two of the 30 inch 2x4s and two of the 60 inch 2x4s for each frame.
For extra strength, apply Titebond wood glue and then use a clamp to hold the 45 degree angles together. Once the corners are clamped, use 2 inch kreg screws from the hardware store to hold them together.
Put Together the Middle Shelf
To assemble to the middle shelf you will want a sturdy surface. On your middle shelf, use 2-60 inch long 2x4s and 2-27 inch long 2x4s and assemble it the same way as the top and bottom frames.
Add MDF Boards to the Top
Add the MDF boards to the workbench top of each frame and shelf. Glue the ½" thick MDF sheets to the frame and then nail them on with a finish nailer. We added the MDF to our shelf the same way as the top and bottom, but since our shelf is 3 inches shorter then our top and bottom frame we used the circular saw and cut along the edge of the 2x4.
Cut the Table Legs
Now it is time to cut the four workbench legs. Cut your 2x4s down to 27 inches. You should have four legs total. Use the kreg tool again to make two pocket holes on each end of the legs. Apply glue to the bottom edge of each leg and then use two inch kreg screws to attach the legs to the bottom frame.
Assemble the Shelf and Frame
After the legs are attached to the bottom shelf, put glue on the top of each leg and place the top frame on. Use a three foot clamp to help hold the top in place while you screw the legs to the top.
Next, add the shelf for extra storage. This shelf is 18 inches high. To make sure we attached it correctly we cut 3-18 inch 2x4s to hold the shelf up until we could get it screwed to our frame.
Drill two pilot holes, one the outside of each leg, for the screws to go into. Then use 2 ½” screws to attach the shelf to the frame. Kreg joints are very strong, but adding this shelf to the center will give this bench a strong and sturdy work surface.

Add Peg Board
One of my favorite things to add to my own DIY workbench is a pegboard on to the side piece. Adding a pegboard on one of the ends is a great way to have more hanging space to store tools. Cut two braces for the top and bottom. Cut the peg board and attach it to the braces using glue and a nail gun.
See how else you can use a pegboard here.
Add Wheels to Your DIY Garage Workbench
When you have a small space to work, it's really important that you have easy access to move around with your table and tools. Adding wheels is optional, but a good idea to help your table be mobile.
Flip the DIY garage work bench over to add wheels. Mark where you want your 3 inch caster wheels to be, then use a drill to make pilot holes for the lag screws. Screw in 4 lag screws for each wheel. When installing lag screws a socket wrench comes in handy.
Sand and Paint Your DIY Workbench
It's a great idea to paint your workbench. Make sure you have plenty of room to paint and a ventilated area. The first thing to do is sand down the rough edges of your table and legs. Tape off the wheels before you prime and paint. Use a Kilz primer for your first coat. Using a primer first helps to seal the wood and create a nice even paint finish. See tips for painting wood here.
When the primer is dry, use a sander once again to smooth the paint out and ensure a smooth paint finish. Next, paint the workbench with two coats of paint. I used a white latex paint in satin. Lastly, after the latex paint has dried, add two coats of a water-based polyurethane for added durability.

Another idea for the perfect workbench? Add a power strip. I added a power strip for my battery chargers and tools. I also added a few hooks to wrap cords around.

The Best DIY Garage Workbench
This DIY garage workbench is the perfect solution for organizing your garage and project space. A good workbench provides an assembly table, is mobile and allows for storage with open shelves and hanging tools.
See other DIY wood projects here!
Happy Building!
Brooke

Kelly says
You did a great job!!! Yahoo! Now I need to go make one....
Janet says
Hi
Great job! Can you tell me what paint sprayer you used. Looked so easy but I get mixed reviews on all so don't know what to buy. Thx